The last step in creating an assignment is reviewing it and assigning it to
a course / section.
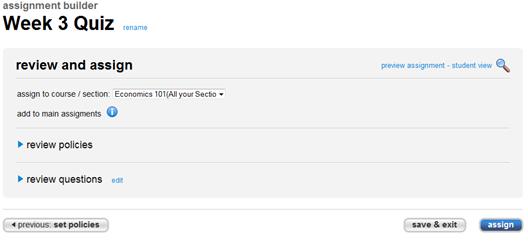 <a onClick="window.open('/olcweb/cgi/pluginpop.cgi?it=jpg::::/sites/dl/free/0000065899/772725/image120.jpg','popWin', 'width=NaN,height=NaN,resizable,scrollbars');" href="#"><img valign="absmiddle" height="16" width="16" border="0" src="/olcweb/styles/shared/linkicons/image.gif"> (12.0K)</a> <a onClick="window.open('/olcweb/cgi/pluginpop.cgi?it=jpg::::/sites/dl/free/0000065899/772725/image120.jpg','popWin', 'width=NaN,height=NaN,resizable,scrollbars');" href="#"><img valign="absmiddle" height="16" width="16" border="0" src="/olcweb/styles/shared/linkicons/image.gif"> (12.0K)</a> - Click the assign to course/section: to select which
sections you want to assign the assignment to.
Note: Republishing an assignment linked to other sections overwrites all
policies you have set in Step 3. However, Connect will display options to
prevent overwriting the Available and Due Dates as well as Time Limits for
other sections. - Click the review policies link to view all the assignment
policies currently set. Click the Edit link next to the
title policy summary to go back to step 3 – Set
Policies.
- Click the review questions link to view a list of all
the assignment questions and assigned point values. Click the edit link
next to review questions to go back to step 2 – add
questions.
- Click assign to assign your assignment to your course
section(s).
You are returned to the Assignment list. The course status will be listed
as Show, meaning it is now viewable by your students. They
can begin the assignment immediately if your assignment policies have been
set to allow that. |