Download as a Word Document:  Hands-On Exercises Ch01 (117.0K) Hands-On Exercises Ch01 (117.0K) 1. Shelbyville Public Library: Editing a PresentationBrent Bowman is the head librarian at the Shelbyville Public Library. He routinely gives presentations at local elementary schools to promote the library’s services. Recently, the library has hired a new story teller and added Internet service and Brent wishes to update his PowerPoint presentation. Assume the role of Brent in opening, editing, and saving an existing presentation. - Open the PP01XTRA01 presentation.
- Save the presentation as "Shelbyville Public Library" to your personal storage location. (Hint: Choose File, Save As.) Your screen should appear similar to Figure 1.1.
| Figure 1.1 "Shelbyville Public Library" presentation |  <a onClick="window.open('/olcweb/cgi/pluginpop.cgi?it=gif:: ::/sites/dl/free/007247050x/26834/Ch01_Image1ho.gif','popWin', 'width=NaN,height=NaN,resizable,scrollbars');" href="#"><img valign="absmiddle" height="16" width="16" border="0" src="/olcweb/styles/shared/linkicons/image.gif"> (50.0K)</a> <a onClick="window.open('/olcweb/cgi/pluginpop.cgi?it=gif:: ::/sites/dl/free/007247050x/26834/Ch01_Image1ho.gif','popWin', 'width=NaN,height=NaN,resizable,scrollbars');" href="#"><img valign="absmiddle" height="16" width="16" border="0" src="/olcweb/styles/shared/linkicons/image.gif"> (50.0K)</a>
|
- To view the slides in the presentation:
CLICK: Next Slide button ( <a onClick="window.open('/olcweb/cgi/pluginpop.cgi?it=gif:: ::/sites/dl/free/007247050x/26834/Ch01_Image2ho.gif','popWin', 'width=NaN,height=NaN,resizable,scrollbars');" href="#"><img valign="absmiddle" height="16" width="16" border="0" src="/olcweb/styles/shared/linkicons/image.gif"> (50.0K)</a> ) on the vertical scroll bar to advance to the next slide <a onClick="window.open('/olcweb/cgi/pluginpop.cgi?it=gif:: ::/sites/dl/free/007247050x/26834/Ch01_Image2ho.gif','popWin', 'width=NaN,height=NaN,resizable,scrollbars');" href="#"><img valign="absmiddle" height="16" width="16" border="0" src="/olcweb/styles/shared/linkicons/image.gif"> (50.0K)</a> ) on the vertical scroll bar to advance to the next slide - Continue with step 3 until you’ve viewed all of the slide sin the presentation.
- CLICK: Previous Slide button (
 <a onClick="window.open('/olcweb/cgi/pluginpop.cgi?it=gif:: ::/sites/dl/free/007247050x/26834/Ch01_Image3ho.gif','popWin', 'width=NaN,height=NaN,resizable,scrollbars');" href="#"><img valign="absmiddle" height="16" width="16" border="0" src="/olcweb/styles/shared/linkicons/image.gif"> (50.0K)</a> ) on the vertical scroll bar until slide 2 appears in the Slide pane <a onClick="window.open('/olcweb/cgi/pluginpop.cgi?it=gif:: ::/sites/dl/free/007247050x/26834/Ch01_Image3ho.gif','popWin', 'width=NaN,height=NaN,resizable,scrollbars');" href="#"><img valign="absmiddle" height="16" width="16" border="0" src="/olcweb/styles/shared/linkicons/image.gif"> (50.0K)</a> ) on the vertical scroll bar until slide 2 appears in the Slide pane - Change the text of the first bullet point from "Attend Ms. Piper’s story hour" to "Attend Ms. Daneel’s story hour."
DOUBLE-CLICK: the text "Piper’s" in the Slide pane TYPE: Daneel’s - Using the Outline tab, add a bullet point on the third slide
CLICK: Next Slide button (<a onClick="window.open('/olcweb/cgi/pluginpop.cgi?it=gif:: ::/sites/dl/free/007247050x/26834/Ch01_Image2ho.gif','popWin', 'width=NaN,height=NaN,resizable,scrollbars');" href="#"><img valign="absmiddle" height="16" width="16" border="0" src="/olcweb/styles/shared/linkicons/image.gif"> (50.0K)</a> ) to display slide 3 CLICK: after the word "homework" in the last bullet point in the Outline tab as shown in Figure 1.2. | Figure 1.2 Positioning your cursor to create a new bullet point | 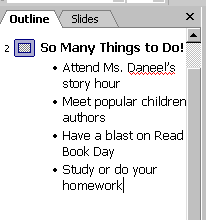 <a onClick="window.open('/olcweb/cgi/pluginpop.cgi?it=gif:: ::/sites/dl/free/007247050x/26834/Ch01_Image4ho.gif','popWin', 'width=NaN,height=NaN,resizable,scrollbars');" href="#"><img valign="absmiddle" height="16" width="16" border="0" src="/olcweb/styles/shared/linkicons/image.gif"> (50.0K)</a> <a onClick="window.open('/olcweb/cgi/pluginpop.cgi?it=gif:: ::/sites/dl/free/007247050x/26834/Ch01_Image4ho.gif','popWin', 'width=NaN,height=NaN,resizable,scrollbars');" href="#"><img valign="absmiddle" height="16" width="16" border="0" src="/olcweb/styles/shared/linkicons/image.gif"> (50.0K)</a>
|
- PRESS:
 <a onClick="window.open('/olcweb/cgi/pluginpop.cgi?it=gif:: ::/sites/dl/free/007247050x/26834/Ch01_Image5ho.gif','popWin', 'width=NaN,height=NaN,resizable,scrollbars');" href="#"><img valign="absmiddle" height="16" width="16" border="0" src="/olcweb/styles/shared/linkicons/image.gif"> (50.0K)</a> to create a new bullet point <a onClick="window.open('/olcweb/cgi/pluginpop.cgi?it=gif:: ::/sites/dl/free/007247050x/26834/Ch01_Image5ho.gif','popWin', 'width=NaN,height=NaN,resizable,scrollbars');" href="#"><img valign="absmiddle" height="16" width="16" border="0" src="/olcweb/styles/shared/linkicons/image.gif"> (50.0K)</a> to create a new bullet point - TYPE: Explore the Internet
- Save and then close the revised presentation.
Data File:  PP01XTRA01 (33.0K) PP01XTRA01 (33.0K)
2. Beavercreek High School Student Council: Editing an AutoContent Presentation
Mita Patel is the president of the Beavercreek High School student council. Since receiving her nifty laptop for her birthday, she has been experimenting with PowerPoint to add visual impact to student council meetings. She wants to create a presentation to help brainstorm ideas for the winter dance. In this exercise, assume the role of Mita and perform the steps listed below. - Launch the AutoContent wizard and then make the following choices when prompted:
- SELECT: the "Brainstorming Session" presentation from the "General" category
- SELECT: "On-screen presentation" as the output option
- TYPE: Winter Dancein the Presentation title text box and click the Finish command button to compile the presentation
- Delete the existing text from the subtitle placeholder on the first slide and then type the following, inserting your actual name where indicated: Prepared by: followed by your name.
- Using the Outline tab, delete slide 4. Then, delete slides 5 and 7. (Note: Click the OK command button when prompted.)
- Using the Outline tab, edit the bulleted list on slide 3 to include only the following items:
- Create theme
- Decide on colors
- DJ or band?
- Admission cost
- Insert a slide that uses the Title and Text layout after slide 3.
- Edit the new slide by typing Past Themes and Colors in the Title placeholder and the following bullet points in the bulleted list placeholder:
- Winter Love — Red and White
- Holiday Jive — Green and Red
- A December to Remember — Blue and White
The slide should appear similar to Figure 1.3. | Figure 1.3 Bulleted List |  <a onClick="window.open('/olcweb/cgi/pluginpop.cgi?it=gif:: ::/sites/dl/free/007247050x/26834/Ch01_Image6ho.gif','popWin', 'width=NaN,height=NaN,resizable,scrollbars');" href="#"><img valign="absmiddle" height="16" width="16" border="0" src="/olcweb/styles/shared/linkicons/image.gif"> (50.0K)</a> <a onClick="window.open('/olcweb/cgi/pluginpop.cgi?it=gif:: ::/sites/dl/free/007247050x/26834/Ch01_Image6ho.gif','popWin', 'width=NaN,height=NaN,resizable,scrollbars');" href="#"><img valign="absmiddle" height="16" width="16" border="0" src="/olcweb/styles/shared/linkicons/image.gif"> (50.0K)</a>
|
- Save the presentation as "Winter Dance" to your personal storage location.
3. ColsOhio.com: Creating a Presentation
Adam Dickson is a Columbus, Ohio resident who wants to start a web site that showcases activities and entertainment options available in the city. He wants to create a presentation to pitch the web site to prospective advertisers. In this exercise, assume the role of Adam to create a new presentation from a design template and add new slides. - To start a new presentation based on the "Axis" design template, do the following:
CHOOSE: File, New CLICK: "From Design Template" in the New Presentation task pane - CLICK: "Axis" thumbnail in the Slide Design task pane
(Note: Select another suitable design template if "Axis" isn’t available.) - To add text to the Title slide:
TYPE: ColsOhio.com in the title placeholder CLICK: in the subtitle placeholder TYPE: One City — One Web Site The Title slide should appear similar to Figure 1.4 | Figure 1.4 Title slide |  <a onClick="window.open('/olcweb/cgi/pluginpop.cgi?it=gif:: ::/sites/dl/free/007247050x/26834/Ch01_Image7ho.gif','popWin', 'width=NaN,height=NaN,resizable,scrollbars');" href="#"><img valign="absmiddle" height="16" width="16" border="0" src="/olcweb/styles/shared/linkicons/image.gif"> (50.0K)</a> <a onClick="window.open('/olcweb/cgi/pluginpop.cgi?it=gif:: ::/sites/dl/free/007247050x/26834/Ch01_Image7ho.gif','popWin', 'width=NaN,height=NaN,resizable,scrollbars');" href="#"><img valign="absmiddle" height="16" width="16" border="0" src="/olcweb/styles/shared/linkicons/image.gif"> (50.0K)</a>
|
- To insert a new slide for creating a bulleted list of items:
?CLICK: New Slide button ( <a onClick="window.open('/olcweb/cgi/pluginpop.cgi?it=gif:: ::/sites/dl/free/007247050x/26834/Ch01_Image8ho.gif','popWin', 'width=NaN,height=NaN,resizable,scrollbars');" href="#"><img valign="absmiddle" height="16" width="16" border="0" src="/olcweb/styles/shared/linkicons/image.gif"> (50.0K)</a> ) on the Formatting toolbar <a onClick="window.open('/olcweb/cgi/pluginpop.cgi?it=gif:: ::/sites/dl/free/007247050x/26834/Ch01_Image8ho.gif','popWin', 'width=NaN,height=NaN,resizable,scrollbars');" href="#"><img valign="absmiddle" height="16" width="16" border="0" src="/olcweb/styles/shared/linkicons/image.gif"> (50.0K)</a> ) on the Formatting toolbar ?The Title and Text layout was automatically applied. This layout is suitable for creating a bulleted list. - To insert a title on the second slide:
TYPE: Concept in the title placeholder - Type the following items in the bulleted list placeholder:
- One-stop entertainment information center
- Easy navigation
- Powerful back-end database
- To insert another slide for creating a bulleted list:
?CLICK: New Slide button (<a onClick="window.open('/olcweb/cgi/pluginpop.cgi?it=gif:: ::/sites/dl/free/007247050x/26834/Ch01_Image8ho.gif','popWin', 'width=NaN,height=NaN,resizable,scrollbars');" href="#"><img valign="absmiddle" height="16" width="16" border="0" src="/olcweb/styles/shared/linkicons/image.gif"> (50.0K)</a> ) on the Formatting toolbar
- TYPE: Contents in the title placeholder
- Type the following items in the bulleted list placeholder:
- Movie Listings
- Concert Updates
- Nightclub Reviews
- Message Board
This slide should now appear similar to Figure 1.5. | Figure 1.5 Bulleted List |  <a onClick="window.open('/olcweb/cgi/pluginpop.cgi?it=gif:: ::/sites/dl/free/007247050x/26834/Ch01_Image9ho.gif','popWin', 'width=NaN,height=NaN,resizable,scrollbars');" href="#"><img valign="absmiddle" height="16" width="16" border="0" src="/olcweb/styles/shared/linkicons/image.gif"> (50.0K)</a> <a onClick="window.open('/olcweb/cgi/pluginpop.cgi?it=gif:: ::/sites/dl/free/007247050x/26834/Ch01_Image9ho.gif','popWin', 'width=NaN,height=NaN,resizable,scrollbars');" href="#"><img valign="absmiddle" height="16" width="16" border="0" src="/olcweb/styles/shared/linkicons/image.gif"> (50.0K)</a>
|
- Save the presentation as "Web Site Pitch" to your personal storage location and then close the presentation.
|


 2002 McGraw-Hill Higher Education