Shelbyville Public Library: Adding Animations and
Transitions Brent Bowman, the head librarian at the Shelbyville Public
Library, wants to update the presentation he gives at local
elementary schools. Since he has mastered animations and
transitions, he feels that adding these to the presentation
would make them more visually appealing. Assume the role of
Brent and perform the steps that he identifies. - Open the PP04XTRA01.ppt file and save it as "School
Presentation" to your personal storage location. Your screen
should now appear similar to Figure 4.1.
Figure 4.1 "School Presentation" presentation |  <a onClick="window.open('/olcweb/cgi/pluginpop.cgi?it=gif:: ::/sites/dl/free/007247050x/26835/PCh04_acq_Image1.gif','popWin', 'width=NaN,height=NaN,resizable,scrollbars');" href="#"><img valign="absmiddle" height="16" width="16" border="0" src="/olcweb/styles/shared/linkicons/image.gif"> (49.0K)</a> <a onClick="window.open('/olcweb/cgi/pluginpop.cgi?it=gif:: ::/sites/dl/free/007247050x/26835/PCh04_acq_Image1.gif','popWin', 'width=NaN,height=NaN,resizable,scrollbars');" href="#"><img valign="absmiddle" height="16" width="16" border="0" src="/olcweb/styles/shared/linkicons/image.gif"> (49.0K)</a>
|
- Use the Slide Show view to familiarize yourself with the
content of the presentation.
- Apply an animation scheme to the presentation.
CHOOSE: Slide Show, Animation Schemes - CLICK: "Pinwheel" in the task pane.
CLICK: Apply to All Slides command button in the task
pane - To apply a transition to all the slides, do the
following:
CHOOSE: Slide Show, Slide Transition CLICK: "Newsflash" in the task pane CLICK: Apply to All Slides command button in the task
pane - To view the slide show:
CLICK: the first slide in the
Slides
tab. CHOOSE: View, Slide Show - Click the left mouse button to progress through the
presentation.
- Close the Slide Transition task pane.
- Save and then close the "School Presentation"
presentation.
Data File:  PP04XTRA01 (33.0K) PP04XTRA01 (33.0K)
Beavercreek High School Student Council: Changing the Color
Scheme and Background
Mita is looking forward to presenting the student
council’s year in review. She loves to find new ways to
customize her presentations. Since the school colors are orange
and black, Mita wants to incorporate these into her
presentation. In this exercise, assume the role of Mita and
apply new formatting to a presentation. - Download and save the pp04xtra03.jpg file to your
personal storage location.
- Open the pp04xtra02.ppt file and save it as "End of Year"
to your personal storage location.
- Review the slides to become familiar with their
content.
- First, apply a new color scheme to the presentation.
CHOOSE: Format, Slide Design CLICK: Color Schemes link near the top of the task
pane - Locate the orange color scheme, located in the first
row.
CLICK: the orange color scheme The color scheme was applied to every slide. - To apply a background picture to all of the slides:
CHOOSE: Format, Background SELECT: Fill Effects from the drop down list as shown in
Figure 4.2. Figure 4.2 Selecting the Fill Effects option |  <a onClick="window.open('/olcweb/cgi/pluginpop.cgi?it=gif:: ::/sites/dl/free/007247050x/26835/PCh04_acq_Image2.gif','popWin', 'width=NaN,height=NaN,resizable,scrollbars');" href="#"><img valign="absmiddle" height="16" width="16" border="0" src="/olcweb/styles/shared/linkicons/image.gif"> (9.0K)</a> <a onClick="window.open('/olcweb/cgi/pluginpop.cgi?it=gif:: ::/sites/dl/free/007247050x/26835/PCh04_acq_Image2.gif','popWin', 'width=NaN,height=NaN,resizable,scrollbars');" href="#"><img valign="absmiddle" height="16" width="16" border="0" src="/olcweb/styles/shared/linkicons/image.gif"> (9.0K)</a>
|
- CLICK: The
Picture
tab in the Background dialog box
CLICK: the Select Picture button ( <a onClick="window.open('/olcweb/cgi/pluginpop.cgi?it=gif:: ::/sites/dl/free/007247050x/26835/PCh04_acq_Image3.gif','popWin', 'width=NaN,height=NaN,resizable,scrollbars');" href="#"><img valign="absmiddle" height="16" width="16" border="0" src="/olcweb/styles/shared/linkicons/image.gif"> (1.0K)</a> ) <a onClick="window.open('/olcweb/cgi/pluginpop.cgi?it=gif:: ::/sites/dl/free/007247050x/26835/PCh04_acq_Image3.gif','popWin', 'width=NaN,height=NaN,resizable,scrollbars');" href="#"><img valign="absmiddle" height="16" width="16" border="0" src="/olcweb/styles/shared/linkicons/image.gif"> (1.0K)</a> ) - Browse to your personal storage location and click on
pp04xtra03.jpg
CLICK: Insert button ( <a onClick="window.open('/olcweb/cgi/pluginpop.cgi?it=gif:: ::/sites/dl/free/007247050x/26835/PCh04_acq_Image4.gif','popWin', 'width=NaN,height=NaN,resizable,scrollbars');" href="#"><img valign="absmiddle" height="16" width="16" border="0" src="/olcweb/styles/shared/linkicons/image.gif"> (1.0K)</a> ) <a onClick="window.open('/olcweb/cgi/pluginpop.cgi?it=gif:: ::/sites/dl/free/007247050x/26835/PCh04_acq_Image4.gif','popWin', 'width=NaN,height=NaN,resizable,scrollbars');" href="#"><img valign="absmiddle" height="16" width="16" border="0" src="/olcweb/styles/shared/linkicons/image.gif"> (1.0K)</a> ) - CLICK: OK button in the Fill Effects dialog box
- CLICK: Apply to All button (
 <a onClick="window.open('/olcweb/cgi/pluginpop.cgi?it=gif:: ::/sites/dl/free/007247050x/26835/PCh04_acq_Image5.gif','popWin', 'width=NaN,height=NaN,resizable,scrollbars');" href="#"><img valign="absmiddle" height="16" width="16" border="0" src="/olcweb/styles/shared/linkicons/image.gif"> (1.0K)</a> ) in Background dialog
box <a onClick="window.open('/olcweb/cgi/pluginpop.cgi?it=gif:: ::/sites/dl/free/007247050x/26835/PCh04_acq_Image5.gif','popWin', 'width=NaN,height=NaN,resizable,scrollbars');" href="#"><img valign="absmiddle" height="16" width="16" border="0" src="/olcweb/styles/shared/linkicons/image.gif"> (1.0K)</a> ) in Background dialog
box - Save the revised presentation.
- Close the Slide Design task pane.
- Preview and then close the presentation.
Data File:  pp04xtra03 (13.0K) pp04xtra03 (13.0K)
Data File: pp04xtra02 (23.0K) ColsOhio.com: Using the Slide Master view Adam has decided to use his new PowerPoint skills to create
a template for future Colsohio.com presentations. In this
exercise, assume the role of Adam and perform the steps listed
below. - Download the pp04xtra04.gif and save it to your personal
storage location.
- Create a new blank presentation.
- Go to the Slide Master view and add a Title Master by
clicking the Insert New Title Master button (
 <a onClick="window.open('/olcweb/cgi/pluginpop.cgi?it=gif:: ::/sites/dl/free/007247050x/26835/PCh04_acq_Image6.gif','popWin', 'width=NaN,height=NaN,resizable,scrollbars');" href="#"><img valign="absmiddle" height="16" width="16" border="0" src="/olcweb/styles/shared/linkicons/image.gif"> (0.0K)</a> ). You
screen should now appear similar to Figure 4.3. <a onClick="window.open('/olcweb/cgi/pluginpop.cgi?it=gif:: ::/sites/dl/free/007247050x/26835/PCh04_acq_Image6.gif','popWin', 'width=NaN,height=NaN,resizable,scrollbars');" href="#"><img valign="absmiddle" height="16" width="16" border="0" src="/olcweb/styles/shared/linkicons/image.gif"> (0.0K)</a> ). You
screen should now appear similar to Figure 4.3. Figure 4.3 Editing the Title Master |  <a onClick="window.open('/olcweb/cgi/pluginpop.cgi?it=gif:: ::/sites/dl/free/007247050x/26835/PCh04_acq_Image7.gif','popWin', 'width=NaN,height=NaN,resizable,scrollbars');" href="#"><img valign="absmiddle" height="16" width="16" border="0" src="/olcweb/styles/shared/linkicons/image.gif"> (40.0K)</a> <a onClick="window.open('/olcweb/cgi/pluginpop.cgi?it=gif:: ::/sites/dl/free/007247050x/26835/PCh04_acq_Image7.gif','popWin', 'width=NaN,height=NaN,resizable,scrollbars');" href="#"><img valign="absmiddle" height="16" width="16" border="0" src="/olcweb/styles/shared/linkicons/image.gif"> (40.0K)</a>
|
- Apply the blue color scheme using the Slide Design task
pane.
- Format the background to include a subtle gradient effect
going from a dark blue to a slightly lighter blue as shown in
Figure 4.4.
Figure 4.4 Applying a gradient background |  <a onClick="window.open('/olcweb/cgi/pluginpop.cgi?it=gif:: ::/sites/dl/free/007247050x/26835/PCh04_acq_Image8.gif','popWin', 'width=NaN,height=NaN,resizable,scrollbars');" href="#"><img valign="absmiddle" height="16" width="16" border="0" src="/olcweb/styles/shared/linkicons/image.gif"> (17.0K)</a> <a onClick="window.open('/olcweb/cgi/pluginpop.cgi?it=gif:: ::/sites/dl/free/007247050x/26835/PCh04_acq_Image8.gif','popWin', 'width=NaN,height=NaN,resizable,scrollbars');" href="#"><img valign="absmiddle" height="16" width="16" border="0" src="/olcweb/styles/shared/linkicons/image.gif"> (17.0K)</a>
|
- Insert the pp04xtra04.gif graphic at the top of the Title
Master and reposition it so that it appears similar to Figure
4.5.
Figure 4.5 Custom Title Master | 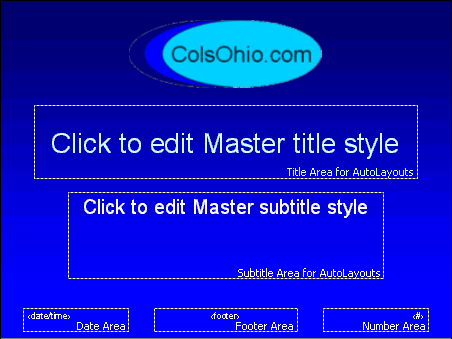 <a onClick="window.open('/olcweb/cgi/pluginpop.cgi?it=gif:: ::/sites/dl/free/007247050x/26835/PCh04_acq_Image9.gif','popWin', 'width=NaN,height=NaN,resizable,scrollbars');" href="#"><img valign="absmiddle" height="16" width="16" border="0" src="/olcweb/styles/shared/linkicons/image.gif"> (23.0K)</a> <a onClick="window.open('/olcweb/cgi/pluginpop.cgi?it=gif:: ::/sites/dl/free/007247050x/26835/PCh04_acq_Image9.gif','popWin', 'width=NaN,height=NaN,resizable,scrollbars');" href="#"><img valign="absmiddle" height="16" width="16" border="0" src="/olcweb/styles/shared/linkicons/image.gif"> (23.0K)</a>
|
- Save your work as a new presentation template. Save the
template to your personal storage location as "Colsohio".
Close the presentation.
Data File: pp04xtra04 (14.0K) |


 2002 McGraw-Hill Higher Education