| Dave Beauvais, Super User: Editing a Macro Dave has been working hard on using Excel to its fullest.
For a long time, Dave has been using Excel to balance his
checkbook. At the end of every month, he creates a new
worksheet, formats it, and copies the previous month's
balance over. Now, he has automated that process with a macro
called NewCheckBook. He's gotten it to work, but has
realized that it will not work month after month unless he
changes the sheet names. Until he can figure out a way to do
that, he is simply going to create a reminder message for
himself. Assume the role of Dave and perform the steps that he
identifies. - Open the EX12XTRA01 Excel file and save it to your
personal storage location as "Dave's Checkbook".
- Execute the macro and observe the results.
PRESS: Ctrl key+Shift key+n - Neat, but not perfect. Execute the macro again.
PRESS: Ctrl key+Shift key+n - You will now get an error message like the one shown in
figure 12.1. The error is telling you that it can't make
a new sheet called
newmonth
because that name is already taken.
PRESS: End command button Figure 12.1 Run-time Error dialog box | 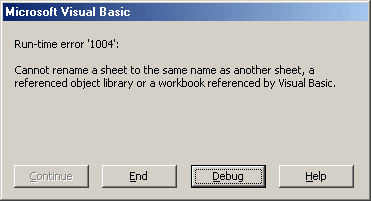 <a onClick="window.open('/olcweb/cgi/pluginpop.cgi?it=gif:: ::/sites/dl/free/0072470941/26807/ECh12_acq_Image3.gif','popWin', 'width=NaN,height=NaN,resizable,scrollbars');" href="#"><img valign="absmiddle" height="16" width="16" border="0" src="/olcweb/styles/shared/linkicons/image.gif"> (5.0K)</a> <a onClick="window.open('/olcweb/cgi/pluginpop.cgi?it=gif:: ::/sites/dl/free/0072470941/26807/ECh12_acq_Image3.gif','popWin', 'width=NaN,height=NaN,resizable,scrollbars');" href="#"><img valign="absmiddle" height="16" width="16" border="0" src="/olcweb/styles/shared/linkicons/image.gif"> (5.0K)</a>
|
- Add a reminder to the macro in the form of a message box.
PRESS: Alt key+F11 key to start the Visual Basic editor - In the Code Window, scroll down and position the
insertion point at the beginning of the last line of code,
"End Sub"
PRESS: Enter key to insert a new blank line - In the new blank line,
- TYPE: msgbox "Remember to change the worksheet
names!"
- Close the Visual Basic editor and save when
prompted.
- In Excel, rename both worksheets.
RIGHT-CLICK:
newmonth
tab
SELECT: Rename
TYPE: the name of the current month
RIGHT-CLICK:
oldmonth
tab
SELECT: Rename
TYPE: October - Execute the macro again.
PRESS: Ctrl key+Shift key+n
The macro executes correctly and includes the message box as
shown in figure 12.2. Figure 12.2 Message Box | 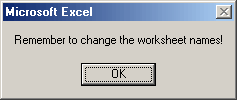 <a onClick="window.open('/olcweb/cgi/pluginpop.cgi?it=gif:: ::/sites/dl/free/0072470941/26807/ECh12_acq_Image7.gif','popWin', 'width=NaN,height=NaN,resizable,scrollbars');" href="#"><img valign="absmiddle" height="16" width="16" border="0" src="/olcweb/styles/shared/linkicons/image.gif"> (3.0K)</a> <a onClick="window.open('/olcweb/cgi/pluginpop.cgi?it=gif:: ::/sites/dl/free/0072470941/26807/ECh12_acq_Image7.gif','popWin', 'width=NaN,height=NaN,resizable,scrollbars');" href="#"><img valign="absmiddle" height="16" width="16" border="0" src="/olcweb/styles/shared/linkicons/image.gif"> (3.0K)</a>
|
- Acknowledge the message box.
CLICK: OK command button - On you own, delete the
newmonth
sheet, and rename the
oldmonth
sheet to the current month.
- Save and close the workbook.
Data File:  ex12xtra01 (25.0K) ex12xtra01 (25.0K)
Waxing Nostalgic Records: Creating a Loop Structure
Al has become an Excel wizard over the last few chapters and
is ready to tackle a little VBA. He has a worksheet that he
uses every month to estimate a total inventory value for items
in the store, for insurance purposes. Because his insurance
rates are different for records released before 1965, he breaks
the total down by records released before 1965 and after. In
the past, he has used custom filters and a little elbow grease
to accomplish this task. In this exercise, he uses VBA to do it
for him. Assume the role of Al and perform the steps that he
identifies. - Open the EX12XTRA02 Excel file and save it to your
personal storage location as "Inventory".
- Open the VBA editor and look at the code that has already
been written. Notice that Al uses the common programming
practice of pseudo-code - comments that describe what
you want to happen at that point.
- First, we need to add some variables to store the two
values, the total values of records released before and after
1965. Under the comment "Need to add my variables here",
TYPE: Dim TotalPre As Currency Dim TotalPost As Currency - Next, we need to add the code that examines the current
cell's contents and copies the price to the appropriate
variable. Under the appropriate comment header,
TYPE: If ActiveCell.Value < 1965 Then TotalPre = TotalPre +
ActiveCell.Offset(0,1).Range("A1").Value Else TotalPost = TotalPost + ActiveCell.Offset(0,
1).Range("A1").Value End If - Next, we add the code that moves the selected cell down
one. Under the appropriate comment header,
TYPE: ActiveCell.Offset(1, 0).Range("A1").Select - We need to loop this collection of actions so that it
keeps going until it reaches a blank cell. Under the comment
heading that says "Loop Starts Here",
TYPE: Do While ActiveCell.Value <> 0 - To close the loop, find the comment that says "'Loop Ends
Here" and
TYPE: Loop - Finally, we need to display the variables in the
appropriate cells. Under the appropriate comment header,
TYPE: Worksheets("INVENTORY").Range("B2").Value =
TotalPre Worksheets("INVENTORY").Range("B3").Value =
TotalPost For troubleshooting purposes, the entire module is shown
in figure 12.3. Figure 12.3 yadda | 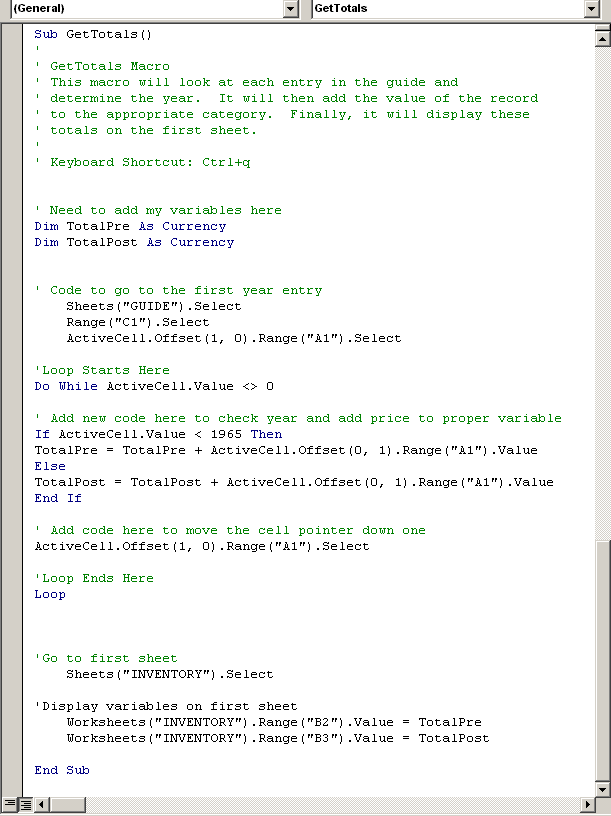 <a onClick="window.open('/olcweb/cgi/pluginpop.cgi?it=gif:: ::/sites/dl/free/0072470941/26807/ECh12_acq_Image8.gif','popWin', 'width=NaN,height=NaN,resizable,scrollbars');" href="#"><img valign="absmiddle" height="16" width="16" border="0" src="/olcweb/styles/shared/linkicons/image.gif"> (16.0K)</a> <a onClick="window.open('/olcweb/cgi/pluginpop.cgi?it=gif:: ::/sites/dl/free/0072470941/26807/ECh12_acq_Image8.gif','popWin', 'width=NaN,height=NaN,resizable,scrollbars');" href="#"><img valign="absmiddle" height="16" width="16" border="0" src="/olcweb/styles/shared/linkicons/image.gif"> (16.0K)</a>
|
- Run the macro.
PRESS: Ctrl key+q
The results will display as shown in figure 12.4 Figure 12.4 "Inventory" workbook | 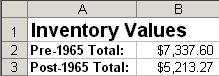 <a onClick="window.open('/olcweb/cgi/pluginpop.cgi?it=gif:: ::/sites/dl/free/0072470941/26807/ECh12_acq_Image9.gif','popWin', 'width=NaN,height=NaN,resizable,scrollbars');" href="#"><img valign="absmiddle" height="16" width="16" border="0" src="/olcweb/styles/shared/linkicons/image.gif"> (2.0K)</a> <a onClick="window.open('/olcweb/cgi/pluginpop.cgi?it=gif:: ::/sites/dl/free/0072470941/26807/ECh12_acq_Image9.gif','popWin', 'width=NaN,height=NaN,resizable,scrollbars');" href="#"><img valign="absmiddle" height="16" width="16" border="0" src="/olcweb/styles/shared/linkicons/image.gif"> (2.0K)</a>
|
- Save and close the workbook.
Data File: ex12xtra02 (131.0K)
Saganaki Motors Computer Help Desk: Adding Controls to a
Worksheet
Richard has gotten very comfortable using VBA to enhance his
workbooks. He keeps the help desk call log in an Excel
workbook. He wishes to create a procedure that will find
unresolved help desk calls ("open tickets") that he can launch
with the push of a button. Assume the role of Richard and
perform the steps that he identifies. - Open the EX12XTRA03 Excel file and save it as "Open
Tickets" to your personal storage location.
- First, open the Visual Basic Editor and create the
procedure shown in figure 12.5. This code should go in the
ThisWorkbook section.
Figure 12.5 GetOpenTix procedure | 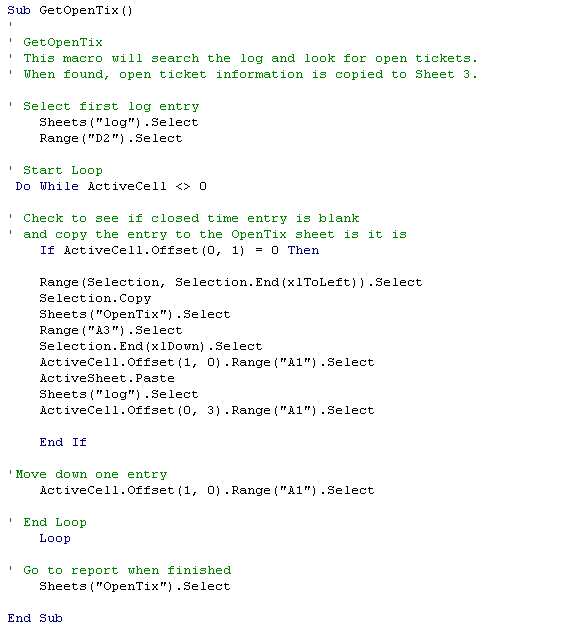 <a onClick="window.open('/olcweb/cgi/pluginpop.cgi?it=gif:: ::/sites/dl/free/0072470941/26807/image016.gif','popWin', 'width=NaN,height=NaN,resizable,scrollbars');" href="#"><img valign="absmiddle" height="16" width="16" border="0" src="/olcweb/styles/shared/linkicons/image.gif"> (7.0K)</a> <a onClick="window.open('/olcweb/cgi/pluginpop.cgi?it=gif:: ::/sites/dl/free/0072470941/26807/image016.gif','popWin', 'width=NaN,height=NaN,resizable,scrollbars');" href="#"><img valign="absmiddle" height="16" width="16" border="0" src="/olcweb/styles/shared/linkicons/image.gif"> (7.0K)</a>
|
- Close the Visual Basic editor.
- In Excel, display the Control Toolbox.
- Using the Control Toolbox, add a command button control to cover cell F1 in the worksheet.
- Display the control's Properties window. Change the (Name) property to GetTix and set the Caption property to Get Open Tickets.
- Close the Properties window. Your screen should now appear similar to Figure 12.6.
Figure 12.6 yadda | 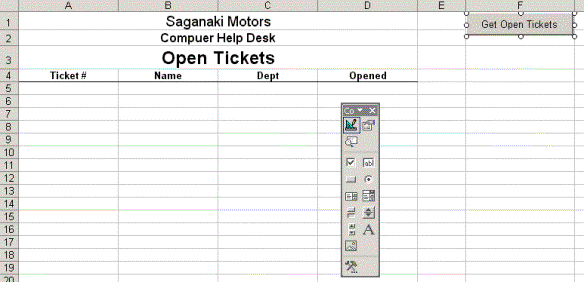 <a onClick="window.open('/olcweb/cgi/pluginpop.cgi?it=gif:: ::/sites/dl/free/0072470941/26807/image018.gif','popWin', 'width=NaN,height=NaN,resizable,scrollbars');" href="#"><img valign="absmiddle" height="16" width="16" border="0" src="/olcweb/styles/shared/linkicons/image.gif"> (19.0K)</a> <a onClick="window.open('/olcweb/cgi/pluginpop.cgi?it=gif:: ::/sites/dl/free/0072470941/26807/image018.gif','popWin', 'width=NaN,height=NaN,resizable,scrollbars');" href="#"><img valign="absmiddle" height="16" width="16" border="0" src="/olcweb/styles/shared/linkicons/image.gif"> (19.0K)</a>
|
- Now, view the code for the button create the procedure shown in figure 12.6. Add the code shown in figure 12.7 to have the button call your procedure when clicked.
Figure 12.7 Assigning a procedure to the Click event | 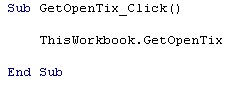 <a onClick="window.open('/olcweb/cgi/pluginpop.cgi?it=gif:: ::/sites/dl/free/0072470941/26807/image019.gif','popWin', 'width=NaN,height=NaN,resizable,scrollbars');" href="#"><img valign="absmiddle" height="16" width="16" border="0" src="/olcweb/styles/shared/linkicons/image.gif"> (0.0K)</a> <a onClick="window.open('/olcweb/cgi/pluginpop.cgi?it=gif:: ::/sites/dl/free/0072470941/26807/image019.gif','popWin', 'width=NaN,height=NaN,resizable,scrollbars');" href="#"><img valign="absmiddle" height="16" width="16" border="0" src="/olcweb/styles/shared/linkicons/image.gif"> (0.0K)</a>
|
- Close the Visual Basic Editor and return to Excel.
- Exit Design Mode and then close the Control Toolbox.
- To test the control, click on the "Get Open Tickets" command button. The procedure should have found 6 instances and reported them.
- Save the workbook and close.
Data File: ex12xtra03 (28.0K) |


 2002 McGraw-Hill Higher Education