| Dave Beauvais, Super User: Using Document Protection Dave has decided that the time has come to start shopping
for an engagement ring for his sweetheart Sally, a fellow Super
User. He has been doing some work in Excel to determine what he
can afford. In this exercise, Dave will protect his work from
accidental changes and protect the document from Sally?s
prying eyes. Assume the role of Dave and perform the steps that
he identifies. - Open the EX10XTRA01 Excel file and save it to your
personal storage location as "Project X".
- Because all cells are locked by default, Dave will first
unlock the only cells that he thinks he will make changes to
in the future.
SELECT: the cell range B2 through B4 CHOOSE: Format, Cells CLICK: the Protection tab CLICK: the locked checkbox to clear it - Next, Dave will have to turn on protection for the
document
PRESS: Ctrl Key + Home Key to move to the top of the sheet
CHOOSE: Tools, Protection, Protect Sheet - Ensure that the
Protect worksheet and contents of locked cells
check box is selected, and then:
CLICK: OK command button
Notice that there are no visible characteristics to
differentiate a protected worksheet from an unprotected
worksheet. - Now, password protect the worksheet so that the user
cannot open it without the correct password.
CHOOSE: File, Save As
CLICK:  <a onClick="window.open('/olcweb/cgi/pluginpop.cgi?it=gif:: ::/sites/dl/free/0072470941/26807/ECh10_acq_Image3.gif','popWin', 'width=NaN,height=NaN,resizable,scrollbars');" href="#"><img valign="absmiddle" height="16" width="16" border="0" src="/olcweb/styles/shared/linkicons/image.gif"> (0.0K)</a> in the toolbar area <a onClick="window.open('/olcweb/cgi/pluginpop.cgi?it=gif:: ::/sites/dl/free/0072470941/26807/ECh10_acq_Image3.gif','popWin', 'width=NaN,height=NaN,resizable,scrollbars');" href="#"><img valign="absmiddle" height="16" width="16" border="0" src="/olcweb/styles/shared/linkicons/image.gif"> (0.0K)</a> in the toolbar area
CHOOSE: General Options - As Sally knows how to quickly hack Office documents with
short, easy passwords, Dave creates a difficult
password.
SELECT:
Password to Open
text box TYPE: 4D@ve'sEyesOnly CLICK: OK command button - Excel will ask you to confirm the password
TYPE: 4D@ve'sEyesOnly CLICK: OK command button - Finish the save operation and close the document.
Data File:  ex10xtra01.xls (17.0K) ex10xtra01.xls (17.0K)
Waxing Nostalgic Records: Creating a Lookup
Al Lincoln uses a price guide to determine how much to
charge for rare records. He has transferred this price guide to
an Excel workbook. He now wants to create an easy form to look
up how much to charge for a record. Assume the role of Al and
perform the steps that he identifies. - Open the EX10XTRA02 Excel file and save it to your
personal storage location as "Record Lookup".
- After familiarizing yourself with the contents of the
"lookup" worksheet, name the lookup table on the "guide"
worksheet
- CLICK:
Guide
tab
SELECT: cell range from A2 to D5673
CLICK: in the Name box
TYPE: albums
PRESS: Enter key
Your worksheet should now resemble figure 10.1. Figure 10.1 yadda | 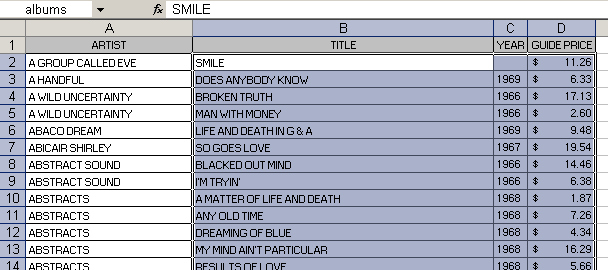 <a onClick="window.open('/olcweb/cgi/pluginpop.cgi?it=gif:: ::/sites/dl/free/0072470941/26807/ECh10_acq_Image5.gif','popWin', 'width=NaN,height=NaN,resizable,scrollbars');" href="#"><img valign="absmiddle" height="16" width="16" border="0" src="/olcweb/styles/shared/linkicons/image.gif"> (10.0K)</a> <a onClick="window.open('/olcweb/cgi/pluginpop.cgi?it=gif:: ::/sites/dl/free/0072470941/26807/ECh10_acq_Image5.gif','popWin', 'width=NaN,height=NaN,resizable,scrollbars');" href="#"><img valign="absmiddle" height="16" width="16" border="0" src="/olcweb/styles/shared/linkicons/image.gif"> (10.0K)</a>
|
- Next, sort the entire table by title.
CHOOSE: Data, Sort
Choose to sort by title and click the OK command
button. - You now enter lookup formulas into the
Lookup
worksheet. To begin:
CLICK:
Lookup
tab
SELECT: cell B4
TYPE: =vlookup(
CLICK: Insert Function button ( <a onClick="window.open('/olcweb/cgi/pluginpop.cgi?it=gif:: ::/sites/dl/free/0072470941/26807/ECh10_acq_Image6.gif','popWin', 'width=NaN,height=NaN,resizable,scrollbars');" href="#"><img valign="absmiddle" height="16" width="16" border="0" src="/olcweb/styles/shared/linkicons/image.gif"> (0.0K)</a> ) <a onClick="window.open('/olcweb/cgi/pluginpop.cgi?it=gif:: ::/sites/dl/free/0072470941/26807/ECh10_acq_Image6.gif','popWin', 'width=NaN,height=NaN,resizable,scrollbars');" href="#"><img valign="absmiddle" height="16" width="16" border="0" src="/olcweb/styles/shared/linkicons/image.gif"> (0.0K)</a> )
The Function Arguments dialog box appears. - To specify the lookup value:
CLICK: Dialog Collapse button ( <a onClick="window.open('/olcweb/cgi/pluginpop.cgi?it=gif:: ::/sites/dl/free/0072470941/26807/ECh10_acq_Image7.gif','popWin', 'width=NaN,height=NaN,resizable,scrollbars');" href="#"><img valign="absmiddle" height="16" width="16" border="0" src="/olcweb/styles/shared/linkicons/image.gif"> (0.0K)</a> ) for the
Lookup_value
text box <a onClick="window.open('/olcweb/cgi/pluginpop.cgi?it=gif:: ::/sites/dl/free/0072470941/26807/ECh10_acq_Image7.gif','popWin', 'width=NaN,height=NaN,resizable,scrollbars');" href="#"><img valign="absmiddle" height="16" width="16" border="0" src="/olcweb/styles/shared/linkicons/image.gif"> (0.0K)</a> ) for the
Lookup_value
text box
CLICK: cell B3
CLICK: Dialog Expand button ( <a onClick="window.open('/olcweb/cgi/pluginpop.cgi?it=gif:: ::/sites/dl/free/0072470941/26807/ECh10_acq_Image8.gif','popWin', 'width=NaN,height=NaN,resizable,scrollbars');" href="#"><img valign="absmiddle" height="16" width="16" border="0" src="/olcweb/styles/shared/linkicons/image.gif"> (0.0K)</a> ) <a onClick="window.open('/olcweb/cgi/pluginpop.cgi?it=gif:: ::/sites/dl/free/0072470941/26807/ECh10_acq_Image8.gif','popWin', 'width=NaN,height=NaN,resizable,scrollbars');" href="#"><img valign="absmiddle" height="16" width="16" border="0" src="/olcweb/styles/shared/linkicons/image.gif"> (0.0K)</a> ) - To complete the Function Arguments dialog box:
SELECT:
Table_array
text box
TYPE: albums
PRESS: Tab key
TYPE: 4 in the
Col_index_num
text box. - Test the VLOOKUP function:
SELECT: cell B3
TYPE: a day in the life
PRESS: Enter key
The worksheet should have updated as shown in figure
10.2. Figure x VLOOKUP results | 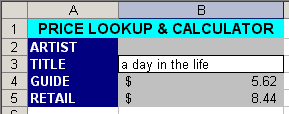 <a onClick="window.open('/olcweb/cgi/pluginpop.cgi?it=gif:: ::/sites/dl/free/0072470941/26807/ECh10_acq_Image10.gif','popWin', 'width=NaN,height=NaN,resizable,scrollbars');" href="#"><img valign="absmiddle" height="16" width="16" border="0" src="/olcweb/styles/shared/linkicons/image.gif"> (3.0K)</a> <a onClick="window.open('/olcweb/cgi/pluginpop.cgi?it=gif:: ::/sites/dl/free/0072470941/26807/ECh10_acq_Image10.gif','popWin', 'width=NaN,height=NaN,resizable,scrollbars');" href="#"><img valign="absmiddle" height="16" width="16" border="0" src="/olcweb/styles/shared/linkicons/image.gif"> (3.0K)</a>
|
- On your own, enter a formula into cell B2 that will
return the artist for the desired title. (
Hint:
The information is in column 2 of the lookup table.)
- Test the lookup by entering some of the following
titles
TITLE | ARTIST | RETAIL PRICE | Afternoon | Afterglow | $28.35 | Long Ago | After Tea | $9.23 | Little Boy | Action | $9.91 |
- Save the worksheet and close.
Data Files:  ex10xtra02 (117.0K) ex10xtra02 (117.0K)
Saganaki Motors Computer Help Desk: Importing Text
Richard has agreed to help create an employee roster. Since
he already has all of the employees in address book, he
exported the address book to the text file EX10XTRA03.txt. He
will now import this text into Excel and format it. Assume the
role of Richard and perform the steps that he identifies. - Download and save the EX10XTRA03.txt file to your
personal storage location.
- Open Excel and ensure that no workbooks are open in the
application window.
- To import a text file:
CHOOSE: File, Open - Using the
Look in
drop-down list box, select the Advantage student data files
location. Then, do the following:
CLICK: down arrow attached to the
Files of type
drop-down list box
SELECT: Text Files from the list
DOUBLE-CLICK: EX10XTRA03
As shown in Figure 10.3, Excel launches the Text Import
Wizard. Figure 10.3 Text Import wizard | 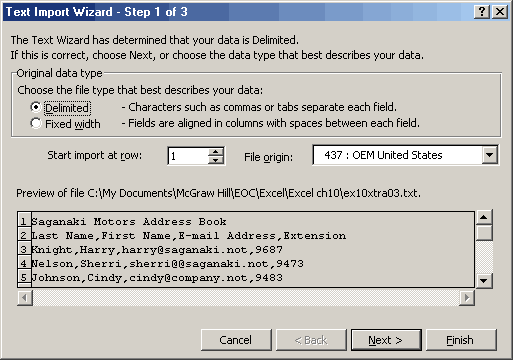 <a onClick="window.open('/olcweb/cgi/pluginpop.cgi?it=gif:: ::/sites/dl/free/0072470941/26807/ECh10_acq_Image11.gif','popWin', 'width=NaN,height=NaN,resizable,scrollbars');" href="#"><img valign="absmiddle" height="16" width="16" border="0" src="/olcweb/styles/shared/linkicons/image.gif"> (10.0K)</a> <a onClick="window.open('/olcweb/cgi/pluginpop.cgi?it=gif:: ::/sites/dl/free/0072470941/26807/ECh10_acq_Image11.gif','popWin', 'width=NaN,height=NaN,resizable,scrollbars');" href="#"><img valign="absmiddle" height="16" width="16" border="0" src="/olcweb/styles/shared/linkicons/image.gif"> (10.0K)</a>
|
- The first line in the text file displays a title.
Therefore, in Step 1 of the wizard, specify that you want to
start the import at row 2.
- In Step 2 of the wizard, set the delimiter to
comma..
- For the remaining steps in the wizard, accept the default
selections:
CLICK:  <a onClick="window.open('/olcweb/cgi/pluginpop.cgi?it=gif:: ::/sites/dl/free/0072470941/26807/ECh10_acq_Image12.gif','popWin', 'width=NaN,height=NaN,resizable,scrollbars');" href="#"><img valign="absmiddle" height="16" width="16" border="0" src="/olcweb/styles/shared/linkicons/image.gif"> (1.0K)</a> <a onClick="window.open('/olcweb/cgi/pluginpop.cgi?it=gif:: ::/sites/dl/free/0072470941/26807/ECh10_acq_Image12.gif','popWin', 'width=NaN,height=NaN,resizable,scrollbars');" href="#"><img valign="absmiddle" height="16" width="16" border="0" src="/olcweb/styles/shared/linkicons/image.gif"> (1.0K)</a> - To finish converting the text file into a workbook, save
the file as "Roster" to your personal storage location. (
Hint:
Ensure that you change the file type to Microsoft Excel
Workbook.)
- Sort the table by last name.
- Apply the "List 2" AutoFormat style to improve the
appearance of the worksheet.
The worksheet should now appear similar to figure 10.4
Figure 10.4 "Roster" worksheet | 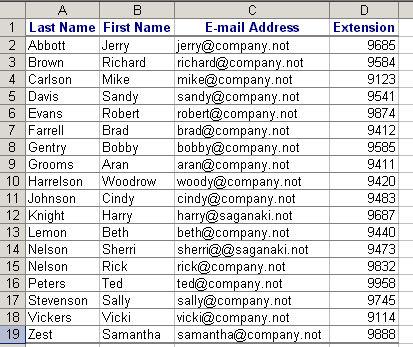 <a onClick="window.open('/olcweb/cgi/pluginpop.cgi?it=gif:: ::/sites/dl/free/0072470941/26807/ECh10_acq_Image13.gif','popWin', 'width=NaN,height=NaN,resizable,scrollbars');" href="#"><img valign="absmiddle" height="16" width="16" border="0" src="/olcweb/styles/shared/linkicons/image.gif"> (11.0K)</a> <a onClick="window.open('/olcweb/cgi/pluginpop.cgi?it=gif:: ::/sites/dl/free/0072470941/26807/ECh10_acq_Image13.gif','popWin', 'width=NaN,height=NaN,resizable,scrollbars');" href="#"><img valign="absmiddle" height="16" width="16" border="0" src="/olcweb/styles/shared/linkicons/image.gif"> (11.0K)</a>
|
Data File:  ex10xtra03 (0.0K) ex10xtra03 (0.0K) |




 2002 McGraw-Hill Higher Education


