| Dave Beauvais, Super-User: Comparing and Merging
Workbooks Dave has created a monthly budget worksheet that he has
shared with Sally in preparation for moving in together after
the wedding. Sally accessed the sheet and made some changes. In
this exercise, Dave will review the changes that Sally made and
accept or reject them. Assume the role of Dave and perform the
steps that he identifies. - Open the EX11XTRA01 Excel file. Notice the word "Shared"
in the Title bar.
- Save the workbook as "Budget" to your personal storage
location.
- Download and save the EX11XTRA01b workbook to your
personal storage location.
- Now merge the changes Sally made in a separate copy of
this workbook into the "Budget" workbook. To begin:
CHOOSE: Tools, Compare and Merge Workbooks
The Select Files to Merge Into Current Workbook dialog box
appears - Navigate to your personal storage location and:
CLICK: EX1113A in the list area CLICK: OK command button - Now review the changes that were made:
CHOOSE: Tools, Track Changes, Accept or Reject Changes
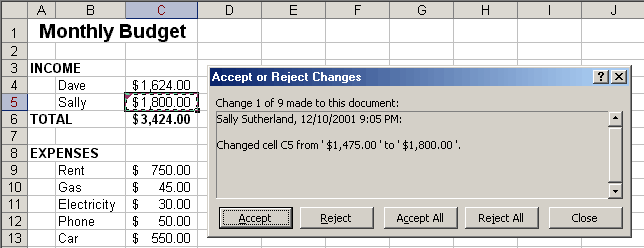
CLICK: OK command button - The first cell change appears in cell C5, as shown in
Figure 11.1. As recorded in the Accept or Reject Changes
dialog box, the original value ($1475) was changed to $1800
by Sally.
Figure 11.1 Reviewing tracked changes after merging
workbooks |  <a onClick="window.open('/olcweb/cgi/pluginpop.cgi?it=gif:: ::/sites/dl/free/0072470941/26807/ECh11_acq_Image1.gif','popWin', 'width=NaN,height=NaN,resizable,scrollbars');" href="#"><img valign="absmiddle" height="16" width="16" border="0" src="/olcweb/styles/shared/linkicons/image.gif"> (13.0K)</a> <a onClick="window.open('/olcweb/cgi/pluginpop.cgi?it=gif:: ::/sites/dl/free/0072470941/26807/ECh11_acq_Image1.gif','popWin', 'width=NaN,height=NaN,resizable,scrollbars');" href="#"><img valign="absmiddle" height="16" width="16" border="0" src="/olcweb/styles/shared/linkicons/image.gif"> (13.0K)</a>
|
- Pleasantly surprised, Dave accepts the change
CLICK: Accept command button - Continue in this manner accepting the changes until cell
C16. Dave has a friend at the local ISP and knows he can get
the connection they need for only $20. At cell C16:
CLICK: Reject command button - Accept the remaining changes (including the rather
embarrassing overlooked groceries row).
- Save and close the revised workbook.
Data File:  ex11xtra01 (27.0K) ex11xtra01 (27.0K)
Data File:  ex11xtra01b (30.0K) ex11xtra01b (30.0K)
Waxing Nostalgic Records: Recording a Macro
Al, the owner of Waxing Nostalgic Records, wants an easy way
to track and organize the orders he receives from his web page
and online auctions. Using only what he has learned about
macros so far, he augments his album lookup sheet to include a
macro that sends the album and artist information to another
sheet. Assume the role of Al and perform the steps that he
identifies.
(Note: This exercise makes heavy use of the Relative
Reference button, covered briefly in section 11.4.1, to toggle
relative referencing on and off. This step is crucial to the
macro performing as expected. As you will learn in chapter 12,
there are easier ways of accomplishing this task if one knows a
little VBA.) - Open the EX11XTRA02 Excel file and save it to your
personal storage location as "Super Album Lookup".
- To create a new macro:
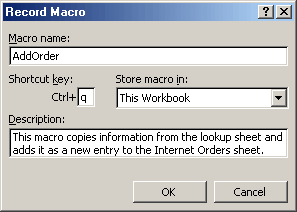
CHOOSE: Tools, Macro, Record New Macro - In the Record Macro dialog box:
TYPE: AddOrder in the Macro name text box
PRESS: Tab key - To specify a keyboard shortcut for executing the macro:
TYPE: q in the
Shortcut key
text box
PRESS: Tab key - Assuming that the macro will only be used in this
workbook, leave the default "This Workbook" selection in the
Store macro in
drop-down list box. Then, proceed to entering a description
of the macro:
PRESS: Tab key - To add text to the existing description:
PRESS: End key to move to the end of the line
TYPE: .
PRESS: Space bar
TYPE: This macro copies information from the lookup sheet
and adds it as a new entry to the Internet Orders sheet.
Your dialog box should now appear similar to Figure
11.2. Figure 11.2 Completing the Record Macro dialog box |  <a onClick="window.open('/olcweb/cgi/pluginpop.cgi?it=gif:: ::/sites/dl/free/0072470941/26807/ECh11_acq_Image4.gif','popWin', 'width=NaN,height=NaN,resizable,scrollbars');" href="#"><img valign="absmiddle" height="16" width="16" border="0" src="/olcweb/styles/shared/linkicons/image.gif"> (5.0K)</a> <a onClick="window.open('/olcweb/cgi/pluginpop.cgi?it=gif:: ::/sites/dl/free/0072470941/26807/ECh11_acq_Image4.gif','popWin', 'width=NaN,height=NaN,resizable,scrollbars');" href="#"><img valign="absmiddle" height="16" width="16" border="0" src="/olcweb/styles/shared/linkicons/image.gif"> (5.0K)</a>
|
- CLICK: OK command button to start recording
Notice that the word "Recording" appears in the Status bar
and that the Stop Recording toolbar floats above the
application window. - Ensure that the Relative Reference button is
not
depressed so that the first steps will be recorded with
absolute references. (See figure 11.3.)
Figure 11.3 The two states of the Relative Reference
button |  <a onClick="window.open('/olcweb/cgi/pluginpop.cgi?it=gif:: ::/sites/dl/free/0072470941/26807/ECh11_acq_Image5.gif','popWin', 'width=NaN,height=NaN,resizable,scrollbars');" href="#"><img valign="absmiddle" height="16" width="16" border="0" src="/olcweb/styles/shared/linkicons/image.gif"> (1.0K)</a> OFF - Recording using absolute
references <a onClick="window.open('/olcweb/cgi/pluginpop.cgi?it=gif:: ::/sites/dl/free/0072470941/26807/ECh11_acq_Image5.gif','popWin', 'width=NaN,height=NaN,resizable,scrollbars');" href="#"><img valign="absmiddle" height="16" width="16" border="0" src="/olcweb/styles/shared/linkicons/image.gif"> (1.0K)</a> OFF - Recording using absolute
references
 <a onClick="window.open('/olcweb/cgi/pluginpop.cgi?it=gif:: ::/sites/dl/free/0072470941/26807/ECh11_acq_Image6.gif','popWin', 'width=NaN,height=NaN,resizable,scrollbars');" href="#"><img valign="absmiddle" height="16" width="16" border="0" src="/olcweb/styles/shared/linkicons/image.gif"> (1.0K)</a> ON - Recording using relative
references <a onClick="window.open('/olcweb/cgi/pluginpop.cgi?it=gif:: ::/sites/dl/free/0072470941/26807/ECh11_acq_Image6.gif','popWin', 'width=NaN,height=NaN,resizable,scrollbars');" href="#"><img valign="absmiddle" height="16" width="16" border="0" src="/olcweb/styles/shared/linkicons/image.gif"> (1.0K)</a> ON - Recording using relative
references
|
- Copy the Artist name.
SELECT: cell B2 CLICK: Copy button ( <a onClick="window.open('/olcweb/cgi/pluginpop.cgi?it=gif:: ::/sites/dl/free/0072470941/26807/ECh11_acq_Image7.gif','popWin', 'width=NaN,height=NaN,resizable,scrollbars');" href="#"><img valign="absmiddle" height="16" width="16" border="0" src="/olcweb/styles/shared/linkicons/image.gif"> (0.0K)</a> ) <a onClick="window.open('/olcweb/cgi/pluginpop.cgi?it=gif:: ::/sites/dl/free/0072470941/26807/ECh11_acq_Image7.gif','popWin', 'width=NaN,height=NaN,resizable,scrollbars');" href="#"><img valign="absmiddle" height="16" width="16" border="0" src="/olcweb/styles/shared/linkicons/image.gif"> (0.0K)</a> ) - CLICK: the INTERNET ORDERS tab to go to that worksheet
SELECT: cell A1 - Turn relative references on.
CLICK: Relative Reference button ( <a onClick="window.open('/olcweb/cgi/pluginpop.cgi?it=gif:: ::/sites/dl/free/0072470941/26807/ECh11_acq_Image8.gif','popWin', 'width=NaN,height=NaN,resizable,scrollbars');" href="#"><img valign="absmiddle" height="16" width="16" border="0" src="/olcweb/styles/shared/linkicons/image.gif"> (0.0K)</a> ) <a onClick="window.open('/olcweb/cgi/pluginpop.cgi?it=gif:: ::/sites/dl/free/0072470941/26807/ECh11_acq_Image8.gif','popWin', 'width=NaN,height=NaN,resizable,scrollbars');" href="#"><img valign="absmiddle" height="16" width="16" border="0" src="/olcweb/styles/shared/linkicons/image.gif"> (0.0K)</a> ) - Navigate to the first empty row by using these keyboard
shortcuts.
PRESS: Ctrl key+Down Arrow key to go to the last row of text PRESS: Down Arrow key again to go to the first empty row - Paste the artist name
SELECT: Edit, Paste Special
CHOOSE: Values radio button
CLICK: OK command button - Turn relative references off.
CLICK: Relative Reference button ( <a onClick="window.open('/olcweb/cgi/pluginpop.cgi?it=gif:: ::/sites/dl/free/0072470941/26807/ECh11_acq_Image8.gif','popWin', 'width=NaN,height=NaN,resizable,scrollbars');" href="#"><img valign="absmiddle" height="16" width="16" border="0" src="/olcweb/styles/shared/linkicons/image.gif"> (0.0K)</a> ) <a onClick="window.open('/olcweb/cgi/pluginpop.cgi?it=gif:: ::/sites/dl/free/0072470941/26807/ECh11_acq_Image8.gif','popWin', 'width=NaN,height=NaN,resizable,scrollbars');" href="#"><img valign="absmiddle" height="16" width="16" border="0" src="/olcweb/styles/shared/linkicons/image.gif"> (0.0K)</a> ) - On your own, return to the LOOKUP sheet and copy cell
B3.
- Return to the INTERNET ORDERS worksheet and select cell
A1.
- Turn relative references on.
CLICK: Relative Reference button ( <a onClick="window.open('/olcweb/cgi/pluginpop.cgi?it=gif:: ::/sites/dl/free/0072470941/26807/ECh11_acq_Image8.gif','popWin', 'width=NaN,height=NaN,resizable,scrollbars');" href="#"><img valign="absmiddle" height="16" width="16" border="0" src="/olcweb/styles/shared/linkicons/image.gif"> (0.0K)</a> ) <a onClick="window.open('/olcweb/cgi/pluginpop.cgi?it=gif:: ::/sites/dl/free/0072470941/26807/ECh11_acq_Image8.gif','popWin', 'width=NaN,height=NaN,resizable,scrollbars');" href="#"><img valign="absmiddle" height="16" width="16" border="0" src="/olcweb/styles/shared/linkicons/image.gif"> (0.0K)</a> ) - Navigate to the proper location for the artist by using
these keyboard shortcuts.
PRESS: Ctrl kry+Down Arrow key to go to the last row of text PRESS: Right Arrow key to go to the cell to the right - On your own, paste the artist name as a value.
- Turn relative references off.
CLICK: Relative Reference button ( <a onClick="window.open('/olcweb/cgi/pluginpop.cgi?it=gif:: ::/sites/dl/free/0072470941/26807/ECh11_acq_Image8.gif','popWin', 'width=NaN,height=NaN,resizable,scrollbars');" href="#"><img valign="absmiddle" height="16" width="16" border="0" src="/olcweb/styles/shared/linkicons/image.gif"> (0.0K)</a> ) <a onClick="window.open('/olcweb/cgi/pluginpop.cgi?it=gif:: ::/sites/dl/free/0072470941/26807/ECh11_acq_Image8.gif','popWin', 'width=NaN,height=NaN,resizable,scrollbars');" href="#"><img valign="absmiddle" height="16" width="16" border="0" src="/olcweb/styles/shared/linkicons/image.gif"> (0.0K)</a> ) - On your own, return to the LOOKUP sheet and copy cell
B5.
- Return to the INTERNET ORDERS worksheet and select cell
A1.
- Turn relative references on.
CLICK: Relative Reference button ( <a onClick="window.open('/olcweb/cgi/pluginpop.cgi?it=gif:: ::/sites/dl/free/0072470941/26807/ECh11_acq_Image8.gif','popWin', 'width=NaN,height=NaN,resizable,scrollbars');" href="#"><img valign="absmiddle" height="16" width="16" border="0" src="/olcweb/styles/shared/linkicons/image.gif"> (0.0K)</a> ) <a onClick="window.open('/olcweb/cgi/pluginpop.cgi?it=gif:: ::/sites/dl/free/0072470941/26807/ECh11_acq_Image8.gif','popWin', 'width=NaN,height=NaN,resizable,scrollbars');" href="#"><img valign="absmiddle" height="16" width="16" border="0" src="/olcweb/styles/shared/linkicons/image.gif"> (0.0K)</a> ) - Navigate to the proper location for the price by using
these keyboard shortcuts.
PRESS: Ctrl key+Down Arrow key to go to the last row of text PRESS: Right Arrow key
twice
to go two cells to the right - On your own, paste the price as a value.
- Finally, select the cell in the name column to facilitate
data entry:
PRESS: Right Arrow key to go to the cell to the right - To stop recording the macro:
CLICK: Stop button ( <a onClick="window.open('/olcweb/cgi/pluginpop.cgi?it=gif:: ::/sites/dl/free/0072470941/26807/ECh11_acq_Image12.gif','popWin', 'width=NaN,height=NaN,resizable,scrollbars');" href="#"><img valign="absmiddle" height="16" width="16" border="0" src="/olcweb/styles/shared/linkicons/image.gif"> (0.0K)</a> ) on the Stop Recording
toolbar <a onClick="window.open('/olcweb/cgi/pluginpop.cgi?it=gif:: ::/sites/dl/free/0072470941/26807/ECh11_acq_Image12.gif','popWin', 'width=NaN,height=NaN,resizable,scrollbars');" href="#"><img valign="absmiddle" height="16" width="16" border="0" src="/olcweb/styles/shared/linkicons/image.gif"> (0.0K)</a> ) on the Stop Recording
toolbar - Test the macro.
SELECT: the LOOKUP worksheet
PRESS: Ctrl key+q
The macro should have made an identical entry under the one
created while recording the macro. Your worksheet should now
resemble figure 11.4. Figure 11.4 Internet Orders worksheet |  <a onClick="window.open('/olcweb/cgi/pluginpop.cgi?it=gif:: ::/sites/dl/free/0072470941/26807/ECh11_acq_Image13.gif','popWin', 'width=NaN,height=NaN,resizable,scrollbars');" href="#"><img valign="absmiddle" height="16" width="16" border="0" src="/olcweb/styles/shared/linkicons/image.gif"> (4.0K)</a> <a onClick="window.open('/olcweb/cgi/pluginpop.cgi?it=gif:: ::/sites/dl/free/0072470941/26807/ECh11_acq_Image13.gif','popWin', 'width=NaN,height=NaN,resizable,scrollbars');" href="#"><img valign="absmiddle" height="16" width="16" border="0" src="/olcweb/styles/shared/linkicons/image.gif"> (4.0K)</a>
|
- Lookup the title "A Miracle" (by Frankie Avalon) and add
it to the Internet Orders worksheet by using your new macro.
SELECT: cell B3 on the Lookup worksheet
TYPE: A Miracle
PRESS: Enter key
PRESS: Ctrl key+q - Save and close the workbook.
Data File:  ex11xtra02 (119.0K) ex11xtra02 (119.0K)
Saganaki Motors Computer Help Desk: Applying Validation
Rules and Conditional Formatting
The Saganaki Motors Computer Help Desk uses Excel to log all
of the calls received. Using the techniques he learned in
chapter 11, Richard wants to "tweak" the log spreadsheet.
Assume the role of Richard and perform the steps that he
identifies. - Open the EX11XTRA03 Excel file and save it to your
personal storage location as "Help Desk Log".
- Since all extensions at Saganaki Motors start with "7",
Richard adds a validation rule to cell D2 to indicate that
the number entered should be between 7000 and 7999. He titles
the error alert "Invalid Extension" and adds the message "The
phone extension you entered is invalid. Phone extensions are
four digits long and begin with a 7."
- He tests the validation by typing "1234" in cell D2 and
gets his error message as shown in figure 11.5. He clicks the
Cancel command button.
Figure 11.5 Validation |  <a onClick="window.open('/olcweb/cgi/pluginpop.cgi?it=gif:: ::/sites/dl/free/0072470941/26807/ECh11_acq_Image15.gif','popWin', 'width=NaN,height=NaN,resizable,scrollbars');" href="#"><img valign="absmiddle" height="16" width="16" border="0" src="/olcweb/styles/shared/linkicons/image.gif"> (9.0K)</a> <a onClick="window.open('/olcweb/cgi/pluginpop.cgi?it=gif:: ::/sites/dl/free/0072470941/26807/ECh11_acq_Image15.gif','popWin', 'width=NaN,height=NaN,resizable,scrollbars');" href="#"><img valign="absmiddle" height="16" width="16" border="0" src="/olcweb/styles/shared/linkicons/image.gif"> (9.0K)</a>
|
- Richard copies the validation from cell D2 to the cell
range D3 through D200 so that future entries will be
validated.
- Richard wants any call that takes more than 15 minutes to
be emphasized. So, he creates conditional format for cell G2
that shows the value in red if it is greater than 15 minutes.
(Hint: Use greater than 0:15 am as the criteria.)
He copies this formatting to the cell range G3 though G200.
His worksheet now appears similar to figure 11.6.
Figure 11.6 Help Desk Log worksheet |  <a onClick="window.open('/olcweb/cgi/pluginpop.cgi?it=gif:: ::/sites/dl/free/0072470941/26807/ECh11_acq_Image16.gif','popWin', 'width=NaN,height=NaN,resizable,scrollbars');" href="#"><img valign="absmiddle" height="16" width="16" border="0" src="/olcweb/styles/shared/linkicons/image.gif"> (4.0K)</a> <a onClick="window.open('/olcweb/cgi/pluginpop.cgi?it=gif:: ::/sites/dl/free/0072470941/26807/ECh11_acq_Image16.gif','popWin', 'width=NaN,height=NaN,resizable,scrollbars');" href="#"><img valign="absmiddle" height="16" width="16" border="0" src="/olcweb/styles/shared/linkicons/image.gif"> (4.0K)</a>
|
- Finally, Richard saves and then closes the revised
workbook.
Data File:  ex11xtra03 (24.0K) ex11xtra03 (24.0K) |


 2002 McGraw-Hill Higher Education


