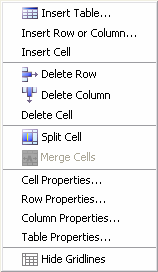
 <a onClick="window.open('/olcweb/cgi/pluginpop.cgi?it=gif::Rich Text Editor - Table Menu::/sites/dl/free/0000065899/564496/ss_RichTxtTableMenu.gif','popWin', 'width=NaN,height=NaN,resizable,scrollbars');" href="#"><img valign="absmiddle" height="16" width="16" border="0" src="/olcweb/styles/shared/linkicons/image.gif">Rich Text Editor - Table Menu (4.0K)</a>Rich Text Editor - Table Menu <a onClick="window.open('/olcweb/cgi/pluginpop.cgi?it=gif::Rich Text Editor - Table Menu::/sites/dl/free/0000065899/564496/ss_RichTxtTableMenu.gif','popWin', 'width=NaN,height=NaN,resizable,scrollbars');" href="#"><img valign="absmiddle" height="16" width="16" border="0" src="/olcweb/styles/shared/linkicons/image.gif">Rich Text Editor - Table Menu (4.0K)</a>Rich Text Editor - Table Menu
- Insert Table… - Opens the Insert Table window. Select the number of rows and columns you wish to include in your table. You can optionally change the alignment, border, cell padding and spacing, as well as specifying width and background color.
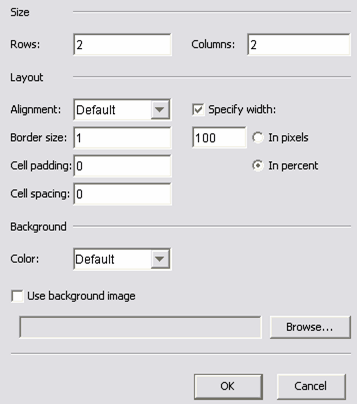 <a onClick="window.open('/olcweb/cgi/pluginpop.cgi?it=gif::Rich Text Editor - Insert Table Menu::/sites/dl/free/0000065899/564496/ss_RichTxtInsertTable.gif','popWin', 'width=NaN,height=NaN,resizable,scrollbars');" href="#"><img valign="absmiddle" height="16" width="16" border="0" src="/olcweb/styles/shared/linkicons/image.gif">Rich Text Editor - Insert Table Menu (14.0K)</a>Rich Text Editor - Insert Table Menu <a onClick="window.open('/olcweb/cgi/pluginpop.cgi?it=gif::Rich Text Editor - Insert Table Menu::/sites/dl/free/0000065899/564496/ss_RichTxtInsertTable.gif','popWin', 'width=NaN,height=NaN,resizable,scrollbars');" href="#"><img valign="absmiddle" height="16" width="16" border="0" src="/olcweb/styles/shared/linkicons/image.gif">Rich Text Editor - Insert Table Menu (14.0K)</a>Rich Text Editor - Insert Table Menu
NOTE: When setting table width, use percentage for the best output.
Background image is not supported in this version of Homework Manager)
- Insert Row or Column… - Opens the Insert Row or Column window.
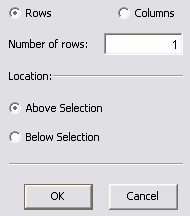 <a onClick="window.open('/olcweb/cgi/pluginpop.cgi?it=gif::Rich Text Editor - Insert Column or Row Menu::/sites/dl/free/0000065899/564496/ss_RichTxtInsertColRow.gif','popWin', 'width=NaN,height=NaN,resizable,scrollbars');" href="#"><img valign="absmiddle" height="16" width="16" border="0" src="/olcweb/styles/shared/linkicons/image.gif">Rich Text Editor - Insert Column or Row Menu (3.0K)</a>Rich Text Editor - Insert Column or Row Menu <a onClick="window.open('/olcweb/cgi/pluginpop.cgi?it=gif::Rich Text Editor - Insert Column or Row Menu::/sites/dl/free/0000065899/564496/ss_RichTxtInsertColRow.gif','popWin', 'width=NaN,height=NaN,resizable,scrollbars');" href="#"><img valign="absmiddle" height="16" width="16" border="0" src="/olcweb/styles/shared/linkicons/image.gif">Rich Text Editor - Insert Column or Row Menu (3.0K)</a>Rich Text Editor - Insert Column or Row Menu
Enter the number of rows or columns you wish to insert. Select Row or Column and select insertion location, below the current selection or above the current selection.
- Insert Cell – Inserts a table cell at the current cursor location. (Note: cursor must be inside a table cell for this option to be available.)
- Delete Row – Deletes the row at the current table cell location.
- Delete Column – Deletes the column at the current table cell location.
- Delete Cell – Deletes the cell at the current table cell location.
- Split Cell – Allows you to split a selected table cell into either a number of rows or columns.
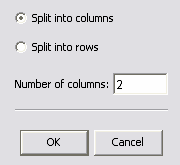 <a onClick="window.open('/olcweb/cgi/pluginpop.cgi?it=gif::Rich Text Editor - Split Cell Menu::/sites/dl/free/0000065899/564496/ss_RichTxtSplitCell.gif','popWin', 'width=NaN,height=NaN,resizable,scrollbars');" href="#"><img valign="absmiddle" height="16" width="16" border="0" src="/olcweb/styles/shared/linkicons/image.gif">Rich Text Editor - Split Cell Menu (3.0K)</a>Rich Text Editor - Split Cell Menu <a onClick="window.open('/olcweb/cgi/pluginpop.cgi?it=gif::Rich Text Editor - Split Cell Menu::/sites/dl/free/0000065899/564496/ss_RichTxtSplitCell.gif','popWin', 'width=NaN,height=NaN,resizable,scrollbars');" href="#"><img valign="absmiddle" height="16" width="16" border="0" src="/olcweb/styles/shared/linkicons/image.gif">Rich Text Editor - Split Cell Menu (3.0K)</a>Rich Text Editor - Split Cell Menu - Cell Properties… - Allows you to set a variety of properties for the selected table cell such as alignment, width, height, row and column spans, text wrapping, and background color. (Note: when specifying widths and heights use percentages instead of pixels for the best test output. Use of a background image is not supported in this version of Homework Manager.)
- Row Properties… - Allows you to set a variety of properties for the selected table row such as alignment, height, and background color. (Note: when specifying heights use percentages instead of pixels for the best test output. Use of a background image is not supported in this version of Homework Manager.)
- Column Properties…- Allows you to set a variety of properties for the selected table column such as alignment, width, and background color. (Note: when specifying widths use percentages instead of pixels for the best test output. Use of a background image is not supported in this version of Homework Manager.)
- Table Properties… - Allows you to set a variety of properties for the selected table such as alignment, width, height, cell spacing and padding, border size, and background color. (Note: when specifying widths and heights use percentages instead of pixels for the best test output. Use of a background image is not supported in this version of Homework Manager.)
- Show/Hide Gridlines – This feature is useful when you have tables that have border widths set to zero. It allows you to see where the column/row grid is in the table for editing purposes. (Note: when this option is set to show gridlines, you will also notice gridlines around other Homework Manager question elements since the Homework Manager question window itself is comprised of several zero border tables)
|