Download as a Word document:  Hands-On Exercise Ch08 (34.0K) Hands-On Exercise Ch08 (34.0K) Traverse Bay ParasailingIn this exercise you will practice creating forms from
scratch, placing, formatting and manipulating bound and unbound
controls. - For this exercise, open the data file AC08HO01.
- To create a new form based on the qryCustomerExc query:
CLICK: New
SELECT: Design view
SELECT: qryCustomerExc, from the drop down list
CLICK: OK command button - Add the customer ID field:
SELECT: CustomerID field in the field list
DRAG: CustomerID to the form window, to 1 inch on the
horizontal ruler and release the mouse button - Add the customer name in calculated control:
SELECT: Textbox control button in the toolbox menu. If this
menu isn't on the screen, click the tool box button on the
form design toolbar.
TYPE: =[Last Name]&", "&[First Name]
PRESS: Enter
SELECT: the textbox
DRAG: the middle right stretch handle to 4.5 inches on the
horizontal ruler
SELECT: Text1 label
DOUBLE CLICK: Text1 text box to select the text and
TYPE: Name
PRESS: Enter - On your own, move the label right, next to the text box
with the name calculation.
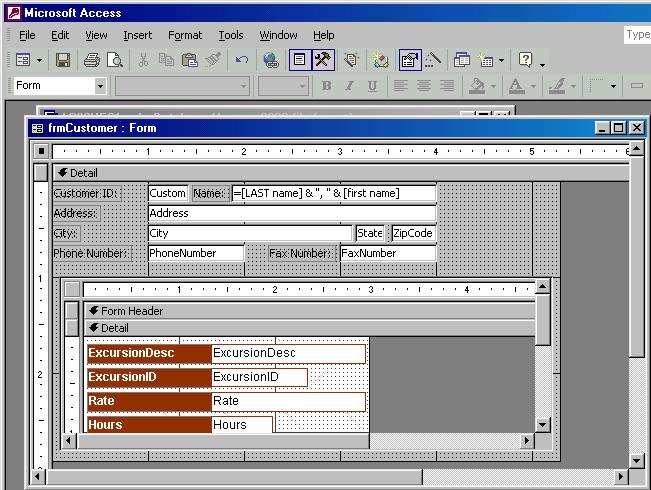
- Arrange and resize the controls so your design looks
similar to the design illustrated in Figure 8-1.
 <a onClick="window.open('/olcweb/cgi/pluginpop.cgi?it=jpg:: ::/sites/dl/free/0072470925/26861/ch08_hoe_image01.jpg','popWin', 'width=NaN,height=NaN,resizable,scrollbars');" href="#"><img valign="absmiddle" height="16" width="16" border="0" src="/olcweb/styles/shared/linkicons/image.gif"> (79.0K)</a> <a onClick="window.open('/olcweb/cgi/pluginpop.cgi?it=jpg:: ::/sites/dl/free/0072470925/26861/ch08_hoe_image01.jpg','popWin', 'width=NaN,height=NaN,resizable,scrollbars');" href="#"><img valign="absmiddle" height="16" width="16" border="0" src="/olcweb/styles/shared/linkicons/image.gif"> (79.0K)</a>
Figure 8-1 - Save the form as frmCustomer.
- Now lets add a subform control to the form. Before starting
make sure that the control wizard button [show button face
here] is depressed. Then,
CLICK: Subform/Subreport Control
CLICK: in the form design window, at approximately .25 inches
on the horizontal ruler, and 1 inch on the vertical ruler (Or
just below the controls you've already added to the
form) - The subform wizard will now start, and you can specify
which items are included in the subform.
CLICK: Next
SELECT: 1 tblExcursions
- On your own, add the following fields to the subform:
ExcursionID, ExcursionDesc, Rate, Hours, Max People, and
Lunch.
- After adding the field, click next until you get to the
final window which allows you to name the subform: Enter the
name "frmExcursionSubform".
- On your own, delete the subform label control only.
- Resize the subform control such that it is both taller and
wider. You may need to adjust the size of the form as well.
Your form should look similar to Figure 8-2 when done.
 <a onClick="window.open('/olcweb/cgi/pluginpop.cgi?it=jpg:: ::/sites/dl/free/0072470925/26861/ch08_hoe_image03.jpg','popWin', 'width=NaN,height=NaN,resizable,scrollbars');" href="#"><img valign="absmiddle" height="16" width="16" border="0" src="/olcweb/styles/shared/linkicons/image.gif"> (86.0K)</a> <a onClick="window.open('/olcweb/cgi/pluginpop.cgi?it=jpg:: ::/sites/dl/free/0072470925/26861/ch08_hoe_image03.jpg','popWin', 'width=NaN,height=NaN,resizable,scrollbars');" href="#"><img valign="absmiddle" height="16" width="16" border="0" src="/olcweb/styles/shared/linkicons/image.gif"> (86.0K)</a>
Figure 8-2 - Switch to Form view, and resize the columns of the subform
to best fit.
- To enhance the form, lets add an AutoFormat to the
form.
- Switch to design view, ensure that the form selector button
is selected. Then,
CLICK: AutoFormat button on the form design tool bar
SELECT: Expedition Style
CLICK: OK Command button - When satisfied with the layout, save the design, close the
form window, and close the database. Then, exit Access.
Find-A-Buddy Dive Club In this exercise you will practice working with reports,
including formatting controls, and report layout to present the
data in useable format. - Open the data file AC08HO01.
- Switch the database window to show the report objects:
CLICK: Reports Object tab - To create a new report in design view,
CLICK: New button on the database window toolbar
SELECT: Design view
CHOOSE: qryRoster, from the dropdown list for tables or
queries
CLICK: OK - To adjust the size to the actual width of the page, stretch
the report design window so that you can see the 6.5-inch mark
on the horizontal ruler. Next choose the File menu, Page setup
and ensure that the margins are all set to 1 inch. Then, Click
and drag the right-hand edge of the report grid to the 6.5-inch
mark. Since the paper is 8.5 inches, the margins are 1 inch,
there is 6.5 inches for the report.
- Add a Report header to the design screen for the title of
the report.
CHOOSE: View, Report header/footer - Add a label control for the Report title.
CLICK: Label control in the toolbox
CLICK: in the Report header area, at the .25 inch mark on the
horizontal ruler
TYPE: Trip Rosters
PRESS: Enter
CHOOSE: Bookman Old Style from the drop down font list on the
formatting tool bar
CHOOSE: 18 point in the Font size drop down list box on the
formatting toolbar
CLICK: Italics button on the formatting toolbar
CHOOSE: Format, Size, To Fit on the menu bar - Save the report as rptRoster.
- Now its time to start populating the detail section of the
report. Make sure you can see the field list box, if it is not
displayed, click the field list button on the report design
tool bar. And then,
SELECT: First Name, Last Name, Phone, and Paid fields
DRAG: The selected fields to the detail section of the report
design grid
SELECT: The Paid label
DRAG: the Paid label under the other label controls.
SELECT: ALL Label controls in the detail section. Hint: click
above the FirstName label, and drag around the other labels.
RIGHT-CLICK: Anywhere in the selection
CHOOSE: Cut - Move the cut labels to the page header.
CLICK: In page header section to select it
RIGHT-CLICK: in page header
CHOOSE: Paste - Position the text box controls in the detail section so
they appear on a single row.
CLICK AND DRAG: First Name so its left edge is at the .5 inch
mark on the horizontal ruler
CLICK AND DRAG: Last Name so its left edge is at the 1.625
mark (5
th
hatch mark past the 1 inch)
CLICK AND DRAG: Phone sp its left edge is at the 2.75 inch
mark
CLICK AND DRAG: Paid check box control to the 4 inch mark - On your own, position the labels in the page header above
their respective text and check box controls. You screen should
look similar to Figure 8-3.
 <a onClick="window.open('/olcweb/cgi/pluginpop.cgi?it=jpg:: ::/sites/dl/free/0072470925/26861/ch08_hoe_image05.jpg','popWin', 'width=NaN,height=NaN,resizable,scrollbars');" href="#"><img valign="absmiddle" height="16" width="16" border="0" src="/olcweb/styles/shared/linkicons/image.gif"> (154.0K)</a> <a onClick="window.open('/olcweb/cgi/pluginpop.cgi?it=jpg:: ::/sites/dl/free/0072470925/26861/ch08_hoe_image05.jpg','popWin', 'width=NaN,height=NaN,resizable,scrollbars');" href="#"><img valign="absmiddle" height="16" width="16" border="0" src="/olcweb/styles/shared/linkicons/image.gif"> (154.0K)</a>
Figure 8-3 - Reduce the area of the Page Header Section.
POSITION: The mouse pointer at the top edge of the Detail
section, so that it looks like a solid plus with arrows on the
top and bottom.
CLICK AND DRAG: The Detail Section divider just below the
labels. - On your own, reduce the size of the detail section, and
using the same technique adjust the size of the Page footer and
the Report footer to zero.
- Next, to list only the members signed up for each trip, you
will specify sorting and grouping properties.
CLICK: Sorting and Grouping button on the report design tool
bar.
CHOOSE: TripDesc in the Field/Expression Text box
SELECT: The group header text box in the group properties area
of the sorting and grouping dialog box.
CHOOSE: Yes in the drop down list
CHOOSE: Yes for the Group Footer property too
CLICK: Close window button in the sorting and grouping title
bar.
Notice that there are now two new sections in the report
design grid. - Save the report design. Click the save button.
- Add the trip information to the report.
SELECT: TripDesc, From, and To fields in the field list box
DRAG: Selected fields to the TripDesc Header - Enhance the controls in the TripDesc Header.
SELECT: the TripDesc Label control
DOUBLE CLICK: TripDesc label text to highlight the caption
TYPE: Description
SELECT: the controls in the group header
CHOOSE: 10 in the font size drop down list
CHOOSE: Bold
CHOOSE: Format, size, to fit from the menu bar - On your own, Align the fields in the header in a single
row, move the labels closer to the text box.
- Add lines to the group header,
CLICK: Line control in the tool box
CLICK AND DRAG: so the line goes the width of the group header
Add a second line below the trip information
SELECT: Both Lines
RIGHT-CLICK: either line
CHOOSE: Properties to display the property sheet for the
selection
SELECT: Border Width text box
CHOOSE: 2 pt from the drop down list - Resize the section just below the border.
- Save the report. Then view the results thus far.
CLICK: Preview button on the report design toolbar - Return to the design view add a calculated control to the
group footer, and then finish the design
CLICK: Design view button on the Report view tool bar
SELECT: Text box control in the tool box
CLICK: in TripDesc group footer at the two inch mark on the
horizontal ruler
CLICK: In the text box
TYPE: =count([lastname])
SELECT: text in Label control
TYPE: "Number of people registered"
Note, move the label control if necessary. Your screen should
look similar to Figure 8-4.  <a onClick="window.open('/olcweb/cgi/pluginpop.cgi?it=jpg:: ::/sites/dl/free/0072470925/26861/ch08_hoe_image07.jpg','popWin', 'width=NaN,height=NaN,resizable,scrollbars');" href="#"><img valign="absmiddle" height="16" width="16" border="0" src="/olcweb/styles/shared/linkicons/image.gif"> (113.0K)</a> <a onClick="window.open('/olcweb/cgi/pluginpop.cgi?it=jpg:: ::/sites/dl/free/0072470925/26861/ch08_hoe_image07.jpg','popWin', 'width=NaN,height=NaN,resizable,scrollbars');" href="#"><img valign="absmiddle" height="16" width="16" border="0" src="/olcweb/styles/shared/linkicons/image.gif"> (113.0K)</a>
Figure 8-4 - Save the report. View the result in print preview. If you
have a printer attached, print the report. Close the print
preview window and the database. And then, exit Access.
 Hands-On Exercises Data Files Ch08 (66.0K) Hands-On Exercises Data Files Ch08 (66.0K) |


 2002 McGraw-Hill Higher Education