Import Student InformationOnce you have created your custom roster column(s), the next step is preparing the file used to import your student information into your new custom column. Importing a student information file allows you to update several custom columns at once. Preparing Your File to Import Homework Manager accepts data file format called “comma-delimited”. This is a common, universal format for exchanging database information. Don’t let the name intimidate you. It’s just a basic text file that contains comma characters between each piece of information you are importing. We’ll show you how to organize your information in Microsoft Excel and then export it as a “comma-delimited” file Homework Manager can understand.
In addition to the custom comma-delimited file mentioned above, Homework Manager can import exported Blackboard and WebCT roster files directly. See Importing Blackboard and WebCT files for more detailed information. Creating a Custom Comma-Delimited FileWe’ve provided a link to export your current roster as an import file template in order to make your job easier in creating your own custom comma-delimited file. You can then modify the template by adding your custom column information and you’ll be ready to go.
To export your current roster as a *.csv template: - Click the Import Student Information link from the Roster screen.
- Next, click the “Export your current roster as a *.csv
template” link at the top right of the screen.
 <a onClick="window.open('/olcweb/cgi/pluginpop.cgi?it=jpg::::/sites/dl/free/0000065899/576817/R1_1_RosterExportTemplateBtn.jpg','popWin', 'width=NaN,height=NaN,resizable,scrollbars');" href="#"><img valign="absmiddle" height="16" width="16" border="0" src="/olcweb/styles/shared/linkicons/image.gif"> (3.0K)</a> <a onClick="window.open('/olcweb/cgi/pluginpop.cgi?it=jpg::::/sites/dl/free/0000065899/576817/R1_1_RosterExportTemplateBtn.jpg','popWin', 'width=NaN,height=NaN,resizable,scrollbars');" href="#"><img valign="absmiddle" height="16" width="16" border="0" src="/olcweb/styles/shared/linkicons/image.gif"> (3.0K)</a> - A dialogue box will open to save the template
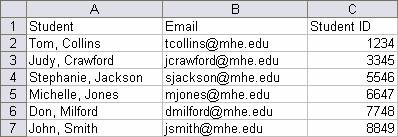
to your computer. - Once saved, open it in Microsoft Excel to view your roster and begin adding your custom student information. A custom comma-delimited file must have an email and student column. The student column should have the student name as “Last Name, First Name”.
 <a onClick="window.open('/olcweb/cgi/pluginpop.cgi?it=jpg::::/sites/dl/free/0000065899/576817/R1_1_RosterTemplateSpreadsheet.jpg','popWin', 'width=NaN,height=NaN,resizable,scrollbars');" href="#"><img valign="absmiddle" height="16" width="16" border="0" src="/olcweb/styles/shared/linkicons/image.gif"> (18.0K)</a> <a onClick="window.open('/olcweb/cgi/pluginpop.cgi?it=jpg::::/sites/dl/free/0000065899/576817/R1_1_RosterTemplateSpreadsheet.jpg','popWin', 'width=NaN,height=NaN,resizable,scrollbars');" href="#"><img valign="absmiddle" height="16" width="16" border="0" src="/olcweb/styles/shared/linkicons/image.gif"> (18.0K)</a>
In this example we’ll assume you want to import Student IDs into your roster. - The first column in the spreadsheet template lists the student names in the “Last Name, First Name” format, the second column lists their email addresses and for this example, the Student ID column is the custom column.
- Enter the corresponding Student ID for each student in this third column.
- Once you have all the Student IDs entered, select Save As… from the File menu. The Save Asdialogue box opens.
- From the Save as type: option menu, select CSV (comma delimited)(*.csv)
- Name your file, for example sectionname_roster.csv and click Save.
- Save the file on your computer’s hard drive in a place you can easily find, such as your “My Documents” folder.
Note: The column headers in the first row must remain intact and unmodified in order for Homework Manager to properly import the student information into your roster.
Now that you have your comma delimited file saved you can import it into your Homework Manager roster. See the Importing Your Student Information File for the next steps. Importing Blackboard and WebCT FilesWhen importing files exported directly from Blackboard or WebCT, the exported file must contain some specific column information Homework Manager uses to identify these file types. Blackboard files must contain a column with the following formatted information.
“Last Name, First Name (Username) | Student Id”, “Assignment 1”, “Assignment 2”
For example…
“Smith, John (jsmith) | 12345”, “95”, “85” WebCT files must contain the following columns: First Name, Last Name, and User ID
For example…
“John”,”Smith”,”12345”,”95”,”85”
Importing Your Student Information File Now that you have your file ready to import we’ll step you through the import process.
To import your prepared Blackboard, WebCT or custom *.csv student information file: - Click Import Column Data on the course section Rosterpage.
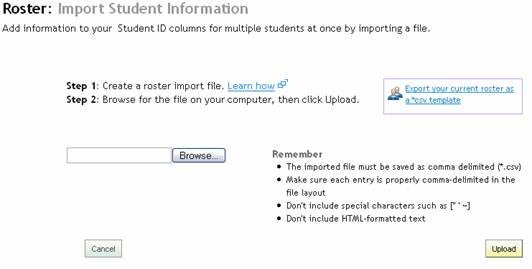
The Roster: Import Student Information page appears.
 <a onClick="window.open('/olcweb/cgi/pluginpop.cgi?it=jpg::::/sites/dl/free/0000065899/576817/R1_1_RosterImportStudentInfoMainScreen.jpg','popWin', 'width=NaN,height=NaN,resizable,scrollbars');" href="#"><img valign="absmiddle" height="16" width="16" border="0" src="/olcweb/styles/shared/linkicons/image.gif"> (15.0K)</a> <a onClick="window.open('/olcweb/cgi/pluginpop.cgi?it=jpg::::/sites/dl/free/0000065899/576817/R1_1_RosterImportStudentInfoMainScreen.jpg','popWin', 'width=NaN,height=NaN,resizable,scrollbars');" href="#"><img valign="absmiddle" height="16" width="16" border="0" src="/olcweb/styles/shared/linkicons/image.gif"> (15.0K)</a>
If your roster already contains custom column information, Homework Manager will display a message indicating information already exists in your custom columns and importing again will overwrite any previously added information. - Next click the Browse… button.
- Locate the file you saved earlier and click Open.
- Click Upload. Once your file has been uploaded, Homework Manager will provide a preview page displaying the information you are importing.
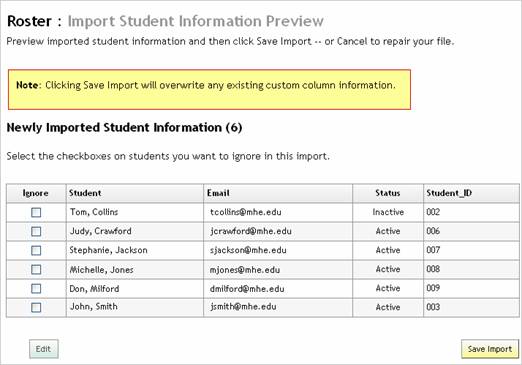 <a onClick="window.open('/olcweb/cgi/pluginpop.cgi?it=jpg::::/sites/dl/free/0000065899/576817/R1_1_RosterImportStudentInfoPreview.jpg','popWin', 'width=NaN,height=NaN,resizable,scrollbars');" href="#"><img valign="absmiddle" height="16" width="16" border="0" src="/olcweb/styles/shared/linkicons/image.gif"> (30.0K)</a> <a onClick="window.open('/olcweb/cgi/pluginpop.cgi?it=jpg::::/sites/dl/free/0000065899/576817/R1_1_RosterImportStudentInfoPreview.jpg','popWin', 'width=NaN,height=NaN,resizable,scrollbars');" href="#"><img valign="absmiddle" height="16" width="16" border="0" src="/olcweb/styles/shared/linkicons/image.gif"> (30.0K)</a> - If the information looks correct, click Save Import to save the imported information to your roster. If there is any incorrect information, click Edit to return to the Import Student Information page. You can then correct your file and upload it again.
After clicking Save Import you are returned to the Roster page with the new custom column data in your course section roster.
 <a onClick="window.open('/olcweb/cgi/pluginpop.cgi?it=jpg::::/sites/dl/free/0000065899/576817/R1_1_RosterImportStudentSuccessMssg.jpg','popWin', 'width=NaN,height=NaN,resizable,scrollbars');" href="#"><img valign="absmiddle" height="16" width="16" border="0" src="/olcweb/styles/shared/linkicons/image.gif"> (3.0K)</a> <a onClick="window.open('/olcweb/cgi/pluginpop.cgi?it=jpg::::/sites/dl/free/0000065899/576817/R1_1_RosterImportStudentSuccessMssg.jpg','popWin', 'width=NaN,height=NaN,resizable,scrollbars');" href="#"><img valign="absmiddle" height="16" width="16" border="0" src="/olcweb/styles/shared/linkicons/image.gif"> (3.0K)</a>
A message appears at the top of the page confirming the column information was imported successfully. This new column information can now be included in your Homework Manager reports and exported for use with other applications.
If there are any problems with your file, Homework Manager will do its best to inform you of the cause of the problem. You can then go back and correct your file and import it again.
 <a onClick="window.open('/olcweb/cgi/pluginpop.cgi?it=jpg::::/sites/dl/free/0000065899/576817/R1_1_RosterImportStudentInfoProblemsPreview.jpg','popWin', 'width=NaN,height=NaN,resizable,scrollbars');" href="#"><img valign="absmiddle" height="16" width="16" border="0" src="/olcweb/styles/shared/linkicons/image.gif"> (36.0K)</a> <a onClick="window.open('/olcweb/cgi/pluginpop.cgi?it=jpg::::/sites/dl/free/0000065899/576817/R1_1_RosterImportStudentInfoProblemsPreview.jpg','popWin', 'width=NaN,height=NaN,resizable,scrollbars');" href="#"><img valign="absmiddle" height="16" width="16" border="0" src="/olcweb/styles/shared/linkicons/image.gif"> (36.0K)</a>
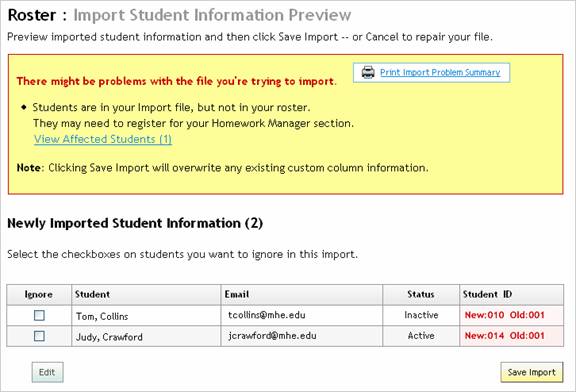
Columns with changed information will contain the new and old values to allow you to verify the new information is correct. Select checkboxes next to any student names you want Homework Manager to ignore when saving the imported file.
Homework Manager will also notify you if there is a problem with any of the information you are importing. For example, if the file you’re importing has no matches for students in your roster, a yellow box with a message indicating this appears at the top of the Import Student Information Preview page. See Roster Import Problems section for more information about resolving problems during the import process.
Roster Import ProblemsIf you have problems with your imported student information file, Homework Manager will try to tell you what is causing the problem on the Import Student Information Preview page.
Some common problems with custom comma-delimited files are: - The file wasn’t saved as a comma delimited (*.csv) file.
- The file contains special characters like [" ' ~].
- The file contains HTML formatted text.
- There are students in your import file that are not in your Homework Manager roster.
- Duplicate information is linked to multiple students in one of your custom columns.
- There are students with the same name(s) in your import file.
 <a onClick="window.open('/olcweb/cgi/pluginpop.cgi?it=jpg::::/sites/dl/free/0000065899/576817/R1_1_RosterImportProblemsSample.jpg','popWin', 'width=NaN,height=NaN,resizable,scrollbars');" href="#"><img valign="absmiddle" height="16" width="16" border="0" src="/olcweb/styles/shared/linkicons/image.gif"> (8.0K)</a> <a onClick="window.open('/olcweb/cgi/pluginpop.cgi?it=jpg::::/sites/dl/free/0000065899/576817/R1_1_RosterImportProblemsSample.jpg','popWin', 'width=NaN,height=NaN,resizable,scrollbars');" href="#"><img valign="absmiddle" height="16" width="16" border="0" src="/olcweb/styles/shared/linkicons/image.gif"> (8.0K)</a>
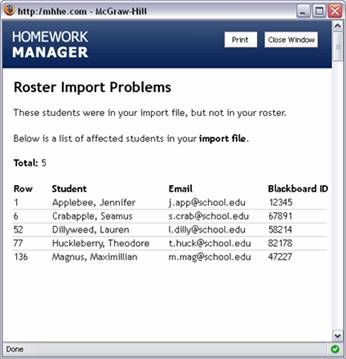
Clicking the “View Affected Students” link will open a new browser window listing the records related to the problem.
 <a onClick="window.open('/olcweb/cgi/pluginpop.cgi?it=jpg::::/sites/dl/free/0000065899/576817/R1_1_RosterImportViewAffectedStudents.jpg','popWin', 'width=NaN,height=NaN,resizable,scrollbars');" href="#"><img valign="absmiddle" height="16" width="16" border="0" src="/olcweb/styles/shared/linkicons/image.gif"> (20.0K)</a> <a onClick="window.open('/olcweb/cgi/pluginpop.cgi?it=jpg::::/sites/dl/free/0000065899/576817/R1_1_RosterImportViewAffectedStudents.jpg','popWin', 'width=NaN,height=NaN,resizable,scrollbars');" href="#"><img valign="absmiddle" height="16" width="16" border="0" src="/olcweb/styles/shared/linkicons/image.gif"> (20.0K)</a>
You can print a summary of the records in question so you have a reference to go back and edit the file and upload it again.
After printing a copy of the Roster Import Problems, click Close Window to return to the Import Student Information Preview page. Then click Edit to go back to the Roster: Import Student Information page. You will need to edit your data file to fix the associated problem and upload it again. |