CARE AND FEEDING OF YOUR COMPUTER
Why Do Things Go Wrong?Like any other complex machinery, your computer needs maintenance and fixes from time to time. Some of these are pretty simple, like changing a right-handed mouse to a left-handed one. Others are more complex, like flashing the BIOS, and should be undertaken only if you’re very knowledgeable about computer systems. One of the characteristics of being a computer-literate person is knowing what your limitations are and handing the job over to the experts. Just like owning a car, owning a computer means that you have to diagnose and fix problems. For many problems, you may want to bring your computer to a professional. For others, you may find it’s cheaper to replace the part or device than fix the problem. For example, if your keyboard goes bad, you will most likely be able to buy a new one for less than it would cost to fix the old one, assuming you could find someone to fix it. Here you can learn about the following topics:
Upgrading Your Hardware and Software
Upgrading means adding to or replacing some computer component to give your computer system more space or speed or power. If you’re replacing anything inside your computer, you need to follow these steps when opening up the system unit so that you don’t fry yourself or your computer. - Prepare for disaster by backing up EVERYTHING.
- Turn off your PC and unplug it. It’s not enough just to turn it off. Unplugging from the wall is an important step to guarantee that you absolutely can’t plug something into the computer while it’s on.
- Pull out any other plugs, like the ones on your monitor and printer. You may have to use a screwdriver since printer plugs often have two little screws holding them in place when they’re connected to the computer.
- Leave yourself plenty of room to work and some space for parts and tools.
- Stand on a static-free tile or linoleum floor. Static can damage computer parts so touch a doorknob or something metal to remove any static you’re carrying. Make sure you and your computer are on surfaces that don’t conduct static electricity. Don’t stand or put the PC on a carpet. Don’t slide your feet around or touch your hair since these actions can generate enough static electricity to zap something in your computer.
- If your system unit has screws holding the cover, remove the screws.
- Remove the cover. You may need to check your PC manual to find out how to do this.
- Remove any dust from inside the box with a vacuum cleaner or compressed air.
- When you’ve finished your installation, plug the computer system in and check to see that everything is working properly BEFORE you put the cover back on or else you’ll have to start again from scratch.
Installing a New Video Card If you’re into gaming, you might want to install a special type of video card, like an ATI Radeon video card, into your computer instead of using the video card that came integrated into your computer. To install your new video card do the following: 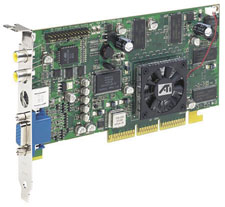 <a onClick="window.open('/olcweb/cgi/pluginpop.cgi?it=jpg:: ::/sites/dl/free/0072464011/18618/Image1.jpg','popWin', 'width=NaN,height=NaN,resizable,scrollbars');" href="#"><img valign="absmiddle" height="16" width="16" border="0" src="/olcweb/styles/shared/linkicons/image.gif"> (121.0K)</a> <a onClick="window.open('/olcweb/cgi/pluginpop.cgi?it=jpg:: ::/sites/dl/free/0072464011/18618/Image1.jpg','popWin', 'width=NaN,height=NaN,resizable,scrollbars');" href="#"><img valign="absmiddle" height="16" width="16" border="0" src="/olcweb/styles/shared/linkicons/image.gif"> (121.0K)</a>
- Change Windows Display to 640K
- Open the system unit following the steps above - be sure that the power is turned off
- If there’s a video card already in the computer, remove screw holding the video card in the computer
- Remove the old video card
- Insert new video card
- Replace the screw to hold the new video card in place
- Plug in the computer
- Turn the power on
The operating system will probably sense that the video card has been changed and will check for new drivers for it. Then, if everything goes well, the system will find and install the new drivers. Adding RAM 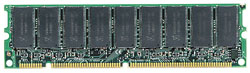 <a onClick="window.open('/olcweb/cgi/pluginpop.cgi?it=jpg:: ::/sites/dl/free/0072464011/18618/Image2.jpg','popWin', 'width=NaN,height=NaN,resizable,scrollbars');" href="#"><img valign="absmiddle" height="16" width="16" border="0" src="/olcweb/styles/shared/linkicons/image.gif"> (36.0K)</a> <a onClick="window.open('/olcweb/cgi/pluginpop.cgi?it=jpg:: ::/sites/dl/free/0072464011/18618/Image2.jpg','popWin', 'width=NaN,height=NaN,resizable,scrollbars');" href="#"><img valign="absmiddle" height="16" width="16" border="0" src="/olcweb/styles/shared/linkicons/image.gif"> (36.0K)</a>
To speed up your computer’s processing capabilities, you may want to add more memory or RAM. The first thing you need to do is find out how much RAM you already have. With your computer operating, check to see how much memory is currently installed as follows: - Click on the Start button
- Choose Settings
- Choose Control Panel
- Click on System
- Choose the General tab if it is not already selected
- There are three headings in that window, look under the one designated Computer and make a note of the current amount of RAM
Be sure to purchase the proper type of memory for your computer. Check out the Crucial or Kingston Technology Web sites for help on selecting the right type. To install new RAM follow these steps - Remove the cover following the instructions at the beginning of this section - be sure that the power is turned off
- Locate the sockets for the memory sticks
- If there are unused sockets, you can add more memory in them
- Gently push the catches back on a DIMM socket to make way for the additional memory.
- The memory will only plug-in one way. Be sure that the notches on the memory stick match up with those on the socket. Insert the memory stick carefully into the guides at the ends of the socket.
- When the memory stick lines up properly and slides down part way into the socket, you’re ready to press it completely into the socket. It will take a bit of force pushing directly down on the memory stick to seat it properly. When it’s seated, the catches will pop into place and hold the memory stick in the socket.
- Replace the cover
- Plug in the computer
- Turn the computer on
- As the computer boots you’ll probably see the size of the memory as the start-process finds it. The size of your RAM should be bigger now by the amount of memory you just added. If you don’t catch that as it goes by, check the amount of memory using the same method as above.
Adding a New Hard Disk, CD or DVD Drive  LLL03 (50.0K) LLL03 (50.0K)
You may want to hard disk or install a bigger one. Alternatively, you may want to add an internal CD or DVD drive to your computer. This can be a little tricky depending on the type of devices you have and how many of the channels are already used. Depending on the configuration of your computer, addition or replacement of a hard drive can be fairly easy or involve many variables. This is one of those tasks that’s better left to a professional or someone who knows a lot about hardware. Here are some things you’d have to consider before proceeding: - the availability of a bay in the system unit
- the availability of an internal channel for an IDE drive. Hard drives and CD ROM drives are examples of IDE devices, and most modern motherboards are capable of supporting four IDE devices via two IDE channels. If your computer does not already have four devices installed, you can add a new one.
- the configuration of all currently installed IDE drives. If there are only two drives and they are both connected to one IDE channel, the new drive can be connected to the other IDE channel. The new drive can then be configured as "Master". If not, the situation is more complicated.
Upgrading Windows or Other Programs It’s very likely that, during ownership of a particular computer system, you’ll want to install a new program or upgrade an existing one. For example, you might want to upgrade to Windows XP from Windows 98. Most upgrades, including the Windows operating system, require approximately the same procedure. Here are the steps: - While Windows is running, insert the upgrade CD into the CD drive
- If the computer is set for autorun, the setup program will start running and, when it has loaded, it will lead you step by step through the upgrade.
- If the startup program does not automatically run, use Windows Explorer to locate the startup.exe and start it executing.
- Most upgrades will check to see that you have a currently installed version of the original software. Then, you’ll be asked to enter the software’s serial number (called a CD key by Microsoft), which is usually a long list of digits and letters, to prove that you have a legal copy of the upgrade.
- Usually during the installation process, you will be asked some questions in dialog windows. You will also be encouraged to register the upgrade with the software manufacturer.
- After the perhaps lengthy process of clicking next, next, etc., the setup program will complete the update.
- Usually you will then have to restart your computer. Then, you can use the new version of the program.
Back to the top Troubleshooting Very often the solution to a problem becomes clear as soon as you diagnose the problem. Other times, diagnosing the problem is a little tricky and even if you do, you can’t do anything about it. In general, if a device doesn’t work, like a printer or monitor, the first thing to do is to check and see whether the power switch is turned on, then make sure the plugs and connectors are tight. Below we’ve provided a few tips on more complicated problems. Power Supply Problems Lots of problems can cause your computer not to come on when you start it up. One of those problems is a bad power supply. The only way to really be sure it is the power supply is to swap it out and try another one. The most frequent problem with a power supply is that the fan quits. There’s a fan on your power supply that transfers the heat away from the inside of the system unit. You can see it if you look at the back panel of your system unit. Do NOT use your computer if the fan stops working. Get your power supply replaced as soon as possible. Checking Hard Disk for Errors If your power goes off while you’re working on your computer or a program crashes, you may get a disk error which means that the operating system didn’t write down where it put some information. You may be able to fix this with the Scandisk utility in Windows. (Different versions of Windows may alter the sequence of steps.) To run the Scandisk program, do the following: - Highlight the drive (usually C)
- Click the right mouse button and choose Properties
- Click on the Tools tab.
- Choose the Error-checking status option (this runs the Scandisk program).
If you turn off your computer without going through the shut-down process in the Start button, Scandisk will start itself automatically. Monitor Problems If your monitor doesn’t work at all or doesn’t work correctly, the causes are many. Here are some symptoms and causes: 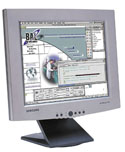 <a onClick="window.open('/olcweb/cgi/pluginpop.cgi?it=jpg:: ::/sites/dl/free/0072464011/18618/Image4.jpg','popWin', 'width=NaN,height=NaN,resizable,scrollbars');" href="#"><img valign="absmiddle" height="16" width="16" border="0" src="/olcweb/styles/shared/linkicons/image.gif"> (59.0K)</a> <a onClick="window.open('/olcweb/cgi/pluginpop.cgi?it=jpg:: ::/sites/dl/free/0072464011/18618/Image4.jpg','popWin', 'width=NaN,height=NaN,resizable,scrollbars');" href="#"><img valign="absmiddle" height="16" width="16" border="0" src="/olcweb/styles/shared/linkicons/image.gif"> (59.0K)</a>
- Color doesn’t look right: It may be that only two colors of the three (red, blue, and green) are showing. In this case the likely cause is that the connector is not properly plugged into the port on the computer, so that only two colors are making contact.
- Dark screen: The power cable is unplugged or the brightness is turned all the way down
- White screen: This is the opposite of the previous problem. In this case the cable to the computer is unplugged or the brightness is turned all the way up.
- Distorted video: It may be that the display is set to an incompatible scan rate. The scan rate is the number of times per second that the image on the screen is renewed. There could also be a magnetic field generated by a motor near the monitor.
- Snow or random output: The reason could be a bad video card or cable.
Printer Problems Printer problems can have a variety of causes. Here’s a sampling. 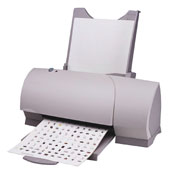 <a onClick="window.open('/olcweb/cgi/pluginpop.cgi?it=jpg:: ::/sites/dl/free/0072464011/18618/Image5.jpg','popWin', 'width=NaN,height=NaN,resizable,scrollbars');" href="#"><img valign="absmiddle" height="16" width="16" border="0" src="/olcweb/styles/shared/linkicons/image.gif"> (51.0K)</a> <a onClick="window.open('/olcweb/cgi/pluginpop.cgi?it=jpg:: ::/sites/dl/free/0072464011/18618/Image5.jpg','popWin', 'width=NaN,height=NaN,resizable,scrollbars');" href="#"><img valign="absmiddle" height="16" width="16" border="0" src="/olcweb/styles/shared/linkicons/image.gif"> (51.0K)</a>
- Paper jamming repeatedly: Every now and then the paper will jam, but if this keep happening, there’s something wrong. It could be that you didn’t load the paper into the tray properly, or that the paper is damp, wrinkled, or too heavy or textured for the printer. It may also be that your printer is sitting unevenly on the desk. Another reason is that the printer feed mechanisms may be dirty.
- Blank pages between printed pages: If you pack the paper too tightly, or if the paper is damp, it may feed more than one sheet at a time. It could also be that you have different types or sizes of paper in the tray together.
- Solid black line on the page: A black line from the top to the bottom of the page usually means that your laser printer cartridge is defective.
- White blotches on output from a laser printer: This usually means that you’re beginning to run out of toner. You can sometimes temporarily fix the problem by taking the cartridge out and gently shaking it from side to side, but this will only buy you a little time before you have to replace the cartridge. Also be careful that you don’t get the toner (fine black powder) on your clothes.
- Colors missing in printouts from an inkjet printer: This usually means that you’ve run out of ink or that the little holes that the ink squirts out of are clogged. Consult your user’s manual to see how to clean them.
- Incorrect font in output from a laser printer: Every laser printer has a set of fonts built in and the printer driver will probably use these fonts instead of the fonts installed on the computer. These printer fonts may look a little different from the fonts that appear on the screen.
Checking Hard Disk Space If you try to save a file and get an error message that there’s no room on the hard disk, you can check how much space is left and how much you have used as follows: - Click once on the drive icon or letter (probably C:)
- Click the right mouse button
- Choose Properties
- Click on the General tab if it’s not already selected
Here you will see in text and graphical form how much space is still unused on the hard disk. Back to the top Operating System Considerations The operating system is the system software that keeps the computer running. The operating system is stored on the hard disk and loaded into memory when you start up your computer. But before that happens, the BIOS checks out the system to see that everything is working. This is called power-on self-test (see below). The CPU gets the POST instructions from the BIOS. BIOS BIOS stands for basic input/output system. The BIOS is a program on a chip that has low-level instructions that get your computer started, much like the starter on your car. The start-up or boot process then follows very specific steps in getting your computer ready for work. The BIOS is the chip that has the Power-On Self-Test and the most basic instructions to get the computer started. You can upgrade your BIOS (put a new program on the chip) by flashing it. Don’t attempt to flash the BIOS when you think there might be a power failure (for example, during a thunderstorm) or if you don’t know what you’re doing, because a damaged BIOS will make your computer completely inoperable. Power-On Self-Test (POST) When you turn your computer on, the BIOS gives the CPU the instructions it needs to get the operating system from the hard drive. The start-up or boot process then follows very specific steps in getting your computer ready for work. - As soon as your turn on your computer the power-on-self-test (POST) begins. Electrical signals flow to your computer acting like an alarm, waking up the components in the system unit.
- The POST checks out all motherboard components to make sure all are working properly. Then it tests the video card, its memory, and the monitor. This is where you first see something on the monitor. Then POST tests each RAM chip. The POST also checks peripherals at this point.
- If everything works the way it’s supposed to during the POST, the BIOS looks for the boot program that loads the operating system, Windows XP, for example. The boot program loads the operating system, which then takes charge of running your computer.
CMOS CMOS stands for Complementary Metal-Oxide Semiconductor, and is a memory chip that keeps track of what sort of hardware you have connected to your system. It keeps information on many operation system parameters like the current date and the number and type of drives that you have connected. You can think of CMOS as the list of characteristics of the system to which the CPU can refer should it forget things like how many hard disks you have or what size they are. The CMOS needs power to keep its configuration information (it works like RAM in that its contents go away when the power is turned off) and so it has its own battery. Safe Mode Windows 98 (and later versions) provide a safe mode option during the start up process. Safe mode allows the computer to start up with the minimum of functionality. This is useful when one of the drivers is malfunctioning and stops the start-up process in midstream. The safe mode option bypasses loading the drivers for the hardware in your computer system. Then you can change the faulty drivers or incorrect configuration settings. To get to safe mode press the F8 key when your first start up your computer, then choose the Safe Mode option from the menu. Be careful about changing any of the configuration settings if you’re not sure what you’re doing or you could cause more trouble for yourself. Left-Handed Mouse  <a onClick="window.open('/olcweb/cgi/pluginpop.cgi?it=jpg:: ::/sites/dl/free/0072464011/18618/Image6.jpg','popWin', 'width=NaN,height=NaN,resizable,scrollbars');" href="#"><img valign="absmiddle" height="16" width="16" border="0" src="/olcweb/styles/shared/linkicons/image.gif"> (23.0K)</a> <a onClick="window.open('/olcweb/cgi/pluginpop.cgi?it=jpg:: ::/sites/dl/free/0072464011/18618/Image6.jpg','popWin', 'width=NaN,height=NaN,resizable,scrollbars');" href="#"><img valign="absmiddle" height="16" width="16" border="0" src="/olcweb/styles/shared/linkicons/image.gif"> (23.0K)</a>
If you’re left-handed and don’t feel comfortable working the mouse with your right hand, you can change the mouse buttons to left-handed mode as follows: - Click on the Start button
- Choose the Settings option
- Choose Control Panel
- Click on the Mouse option
- Choose the Buttons tab and change it from Right-Handedto Left-Handed
You can also change the speed of the cursor and the size of the arrow by choosing the Motion tab instead of the Buttons tab. Undeleting a File If you delete a file that you need again, the amount of trouble it takes to retrieve it depends on whether you put it into the Recycle Bin or not. If the file was on the hard disk, then all you have to do is open the Recycle Bin and drag and drop the file into the folder you want it in. This will work as long as you haven’t emptied the recycle bin since you deleted the file. If the file was on a Zip disk or a floppy, you’ll need to use a utility to retrieve the file. Norton has such a utility at Symantec’s Web site. Changing Your Desktop Background If you want to choose another of the standard Windows background do the following: - Click the Start button
- Click on Control Panel
- Click on Display
- Choose the Background tab
- Choose the background you want
If you want to use a background not provided by Windows, do the following - Click the Start button
- Click on Control Panel
- Click on Display
- Choose the Background tab
- Browse for the picture file you want to use as a background
- Click on Apply
Removing Your Desktop Background If you’re tired of the new custom background and want to go back to one of the standard Windows ones, do the following - Open the My Computer folder or icon
- Choose the View menu
- Choose Folder Options
- Choose Classic Style
Again remember that different versions of Windows work slightly differently. Back to the top General Maintenance It’s a good idea to take care of your computer devices to prevent problems later on. Cleaning your computer components and taking care of other housekeeping tasks like defragmenting your hard drive are necessary from time to time. Below you’ll find some pointers on maintenance tasks. 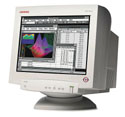 <a onClick="window.open('/olcweb/cgi/pluginpop.cgi?it=jpg:: ::/sites/dl/free/0072464011/18618/Image7.jpg','popWin', 'width=NaN,height=NaN,resizable,scrollbars');" href="#"><img valign="absmiddle" height="16" width="16" border="0" src="/olcweb/styles/shared/linkicons/image.gif"> (51.0K)</a> <a onClick="window.open('/olcweb/cgi/pluginpop.cgi?it=jpg:: ::/sites/dl/free/0072464011/18618/Image7.jpg','popWin', 'width=NaN,height=NaN,resizable,scrollbars');" href="#"><img valign="absmiddle" height="16" width="16" border="0" src="/olcweb/styles/shared/linkicons/image.gif"> (51.0K)</a>
Cleaning Your Screen, Keyboard, and Mouse To clean your CRT screen you can use any window cleaner and a soft cloth. However, it’s a good idea to get special anti-static glass cleaner, but don’t use anything abrasive that might scratch the screen. Spray the cleaner on the cloth rather than onto the screen since the liquid might leak inside the casing. To clean your keyboard, use a vacuum cleaner. You could also turn your keyboard upside down and blow out the dirt with compressed air. You can buy compressed air in a spray can. Your mouse or trackball tends to collect dirt and dust which lodge between the ball and the rubber or plastic rollers inside the mouse or trackball. Clean the rollers with a pure cleaner like 95% or 190 proof denatured alcohol. Don’t use contact cleaner since it contains a lubricant. To prevent mishaps, don’t leave food or drink near the keyboard or mouse. Cleaning Storage Drives Hard drives are sealed, so other than dusting them off, there’s not much you need to do. The drives with removable media, however, are a different story. Floppy Disk Drives: Floppy disk drives collect a lot of dust and dirt. You can get kits to clean the heads that can clog. The kit has a floppy disk casing that has a cloth inside rather than a Mylar disk. You put the cleaner fluid onto the cloth, and as it spins the cloth cleans the heads Optical Disc Drives: You can get kits to clean CD and DVD drives. They clean the lens that the laser uses. It’s better to clean floppy drives and optical drives only when you think there may be a problem since the cleaning fluids are pretty abrasive. Creating and Using Folders Let’s say you didn’t have any cupboards or drawers in you apartment. And let’s say that you simply dump everything you bring into the house on the living room floor. In a very short time you’d very fed up with your filing system. It’s the same with your computer files. You need to organize your files into folders in the same way you organize your other possessions into different rooms, different cupboards, and different drawers. To create a folder do the following: - Highlight the drive or folder you want to create a folder in
- From the File menu choose New
- Choose Folder
- Give the folder a name
Defragmenting Your Hard Disk After a period use, your hard disk files may become fragmented. That means that there wasn’t enough space to store the file as one long strip, and so pieces of the file were stored all over the hard disk platters. When your file is badly fragmented, you’ll notice that it takes a long time to load the file and that there’s a grinding noise coming from the hard disk. The delay and grinding mean that the disk drive is finding and reassembling the file. To fix fragmented files and store them in contiguous chunks, you need to defragment the hard disk. To defragment your had disk follow these steps: - Highlight the drive (usually C)
- Click the right mouse button and choose Properties
- Click on the Tools tab.
- Choose the Defragmentation option
If this doesn’t work, you may need to reboot your computer in safe mode. If you have something running that accesses your hard drive while you’re trying to run the defragmentation program, the defragmentation program will restart itself repeatedly and never finish. Back to the top Protection There are many ways to protect your computer and the information stored there from damage — accidental or otherwise. The simplest precaution that you can take is to back up your information on a regular basis. You can also protect your computer from power surges and from intrusion by hackers and viruses. Backing up Your Hard Disk You have important files on your hard disk, those you created and those that are program or applications files. It’s very good practice to back up your files on a regular basis. You can back up your files onto floppy disks (not recommended because it takes too many disks) Zip disks, CDs, removable hard disks, or other hard drives. Windows has a back up utility that you can access in the following way - Highlight the drive (usually C)
- Click the right mouse button and choose Properties
- Click on the Tools tab.
- Choose the Back Up option
Instead of using the built-in Windows back-up program, you could also use a back-up program from one of many other vendors. Norton, for example, has Norton Ghost, which will copy the contents of one hard disk to another hard disk. It might be worth your while to have two hard disks if the data on your hard disk is very valuable. Duplicate drives is usually one of the features on network servers. You can find out more about Norton Utilities at Symantec Corp. Instead of backing up your information by manually starting the back-up program, you could automate the process. QuikSync is a program that will save the files you specify to a Zip or Jaz drive or another hard drive either on your own computer or on a another computer on the network as often as you want. You can find out more at Iomega. MyDocs.com is a Web site that will sell you disk space. You can check out the types of deals available at MyDocs.com. Uninterruptible Power Supplies (UPS) and Surge Protectors If the power goes off while your working on your computer, anything you haven’t saved will disappear. Not good! To prevent this you need a UPS. A uninterruptible power supply (UPS) uses a large battery to store power and takes over when your power dies. A UPS is not intended to give you unlimited computer usage, it just gives you time to save what you’re doing and shut down. Many UPSs include hardware and software to automatically save data and shut down the computer. UPSs come in various sizes and at a variety of prices. Usually, the more you pay, the longer you can work without power from the wall outlet. Most UPSs filter out spikes and surges on the power lines. This will help your computer last longer. A surge protector built into an outlet power strip also may protects your computer system against surges of electrical power. Software Firewalls You can get software that will alert you when intruders try to access your computer. This is called firewall software. There are many types of software firewalls on the market for under $100. If you have a broadband Internet connection, you’d be well advised to install firewall software. Some software lets you assign security levels (high, medium, and low). Usually a window pops up when someone is trying to access your system. Others let you specify information that may not be transmitted through Web forms. For example, you might now want your credit card numbers to go to Internet Explorer’s AutoComplete feature. Some software firewalls check information being transmitted through chat, e-mail, or instant messenger and some do. Here are some Web sites you can check out for software firewalls and their prices. Encryption If you’re worried about unauthorized people reading your e-mail, you can encrypt it. Pretty Good Privacy has a freeware encryption program you can download. Steganos is another good encryption program. Other options are also available. For example, ZixMail will let you send encrypted e-mail from Outlook. You can read messages as encrypted attachments if you’re registered with ZixMail. If you wish, you can store your messages under password protection where you can look at it in a browser with encryption capabilities. HushMail will let you encrypt e-mail and also handles digital signatures. You can send and receive encrypted messages from anyone who has a Web browser. The drawback with HushMail is that it doesn’t use industry-standard digital standards so you can only exchange mail with other HushMail users. Anti-Virus Software Anti-virus software looks for and tries to get rid of different types of viruses like worms and Trojan horses. A worm spreads by sending itself to everyone in the infected user’s Outlook address book. Trojan horses are hidden like the Greeks in their mythical wooden horse. The damaging code is hidden in other software, like a game. Most anti-virus software works continually in the background checking all files, including e-mail message and attachments as they arrive. Anti-virus software works by scanning a file and comparing it to its list of virus signatures. The list is comprised of all the viruses that the anti-virus software company knows about and thinks are on the loose. This is the reason you need to update your anti-virus software very frequently so that you have the newest virus signatures. But, anti-virus software can sometimes find viruses without a virus signature. In this case the software uses a method called heuristics, which means that it looks at how a particular piece of software acts. Sometimes this leads to a false positive, which means that the anti-virus software finds a virus in a file where it doesn’t exist. Back to the top
| 

 2002 McGraw-Hill Higher Education