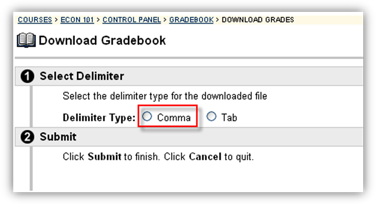
Connect provides the ability to export your assignment grade reports to other course management software. Microsoft Excel is the universal format for exporting your reports. Other common course management formats supported by Connect are Blackboard and WebCT. These two course management formats are only available from the Assignment Results report, and only if your roster contains Blackboard or WebCT custom columns. See the Customize Roster Columns section for more information. Please click your course management version for step-by-step directions on setting up the roster columns and exporting the reports for each version: Blackboard 7 or lower | Blackboard 8 or higher | WebCT Note: Your Connect Roster must have a column for Blackboard ID populated with Blackboard's Username information for each student. The steps below will show you how to add this custom column and import your students' Blackboard ID's. Click here to skip ahead to Exporting the Report if you already adjusted your rosters to include your students' BlackBoard ID's. - In Blackboard's Gradebook, select Download Grades.
-
Choose the Comma Delimited option and save file to your desktop.
 <a onClick="window.open('/olcweb/cgi/pluginpop.cgi?it=png::::/sites/dl/free/0000065899/773107/downloadbbgradebook.png','popWin', 'width=426,height=274,resizable,scrollbars');" href="#"><img valign="absmiddle" height="16" width="16" border="0" src="/olcweb/styles/shared/linkicons/image.gif"> (29.0K)</a> <a onClick="window.open('/olcweb/cgi/pluginpop.cgi?it=png::::/sites/dl/free/0000065899/773107/downloadbbgradebook.png','popWin', 'width=426,height=274,resizable,scrollbars');" href="#"><img valign="absmiddle" height="16" width="16" border="0" src="/olcweb/styles/shared/linkicons/image.gif"> (29.0K)</a>The file that was downloaded should appear in Microsoft Excel in the following format:  <a onClick="window.open('/olcweb/cgi/pluginpop.cgi?it=png::::/sites/dl/free/0000065899/773107/blackboarddownloadedexcel.png','popWin', 'width=508,height=200,resizable,scrollbars');" href="#"><img valign="absmiddle" height="16" width="16" border="0" src="/olcweb/styles/shared/linkicons/image.gif"> (44.0K)</a> <a onClick="window.open('/olcweb/cgi/pluginpop.cgi?it=png::::/sites/dl/free/0000065899/773107/blackboarddownloadedexcel.png','popWin', 'width=508,height=200,resizable,scrollbars');" href="#"><img valign="absmiddle" height="16" width="16" border="0" src="/olcweb/styles/shared/linkicons/image.gif"> (44.0K)</a> - In Connect, Select the section Roster from my courses.
-
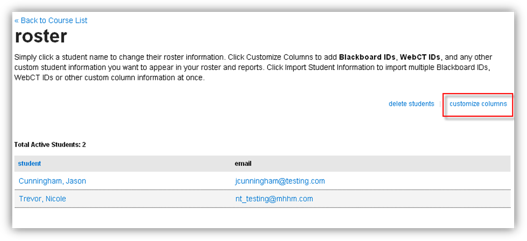
Click Customize Columns
 <a onClick="window.open('/olcweb/cgi/pluginpop.cgi?it=png::::/sites/dl/free/0000065899/773107/roster.png','popWin', 'width=577,height=311,resizable,scrollbars');" href="#"><img valign="absmiddle" height="16" width="16" border="0" src="/olcweb/styles/shared/linkicons/image.gif"> (34.0K)</a> <a onClick="window.open('/olcweb/cgi/pluginpop.cgi?it=png::::/sites/dl/free/0000065899/773107/roster.png','popWin', 'width=577,height=311,resizable,scrollbars');" href="#"><img valign="absmiddle" height="16" width="16" border="0" src="/olcweb/styles/shared/linkicons/image.gif"> (34.0K)</a> - Click the Add Columns button on the top right.
-
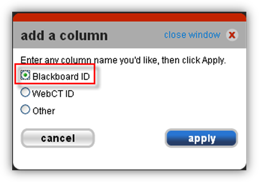
Choose Blackboard ID.
 <a onClick="window.open('/olcweb/cgi/pluginpop.cgi?it=png::::/sites/dl/free/0000065899/773107/addacolumn.png','popWin', 'width=309,height=252,resizable,scrollbars');" href="#"><img valign="absmiddle" height="16" width="16" border="0" src="/olcweb/styles/shared/linkicons/image.gif"> (19.0K)</a> <a onClick="window.open('/olcweb/cgi/pluginpop.cgi?it=png::::/sites/dl/free/0000065899/773107/addacolumn.png','popWin', 'width=309,height=252,resizable,scrollbars');" href="#"><img valign="absmiddle" height="16" width="16" border="0" src="/olcweb/styles/shared/linkicons/image.gif"> (19.0K)</a> - Click Apply and Save.
-
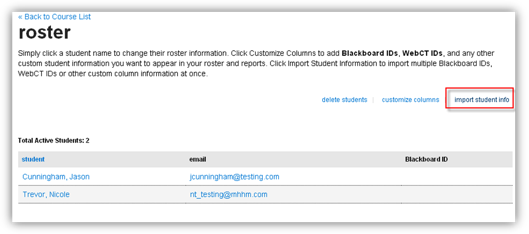
Choose the import student info link on the top right of roster.
 <a onClick="window.open('/olcweb/cgi/pluginpop.cgi?it=png::::/sites/dl/free/0000065899/773107/roster1.png','popWin', 'width=579,height=304,resizable,scrollbars');" href="#"><img valign="absmiddle" height="16" width="16" border="0" src="/olcweb/styles/shared/linkicons/image.gif"> (36.0K)</a> <a onClick="window.open('/olcweb/cgi/pluginpop.cgi?it=png::::/sites/dl/free/0000065899/773107/roster1.png','popWin', 'width=579,height=304,resizable,scrollbars');" href="#"><img valign="absmiddle" height="16" width="16" border="0" src="/olcweb/styles/shared/linkicons/image.gif"> (36.0K)</a> -
Browse to the file exported from Blackboard and click Upload.
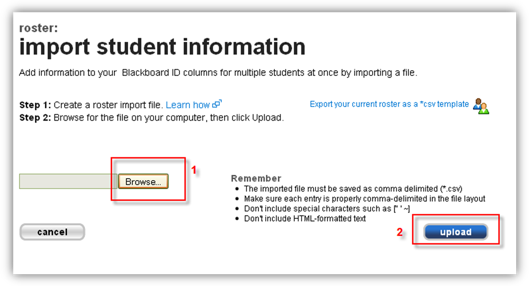 <a onClick="window.open('/olcweb/cgi/pluginpop.cgi?it=png::::/sites/dl/free/0000065899/773107/importroster.png','popWin', 'width=580,height=356,resizable,scrollbars');" href="#"><img valign="absmiddle" height="16" width="16" border="0" src="/olcweb/styles/shared/linkicons/image.gif"> (47.0K)</a> <a onClick="window.open('/olcweb/cgi/pluginpop.cgi?it=png::::/sites/dl/free/0000065899/773107/importroster.png','popWin', 'width=580,height=356,resizable,scrollbars');" href="#"><img valign="absmiddle" height="16" width="16" border="0" src="/olcweb/styles/shared/linkicons/image.gif"> (47.0K)</a> - Confirm the student information and click on the save.
- Select a section from my courses.
- Click the Reports tab at the top right of the page.
-
Select a report, changing any options if needed.
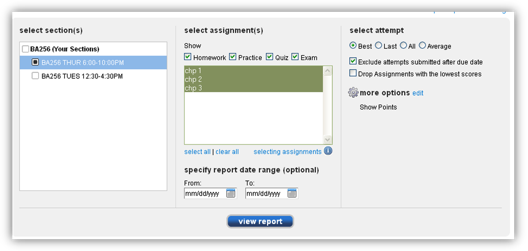 <a onClick="window.open('/olcweb/cgi/pluginpop.cgi?it=png::::/sites/dl/free/0000065899/773107/reportoption.png','popWin', 'width=578,height=321,resizable,scrollbars');" href="#"><img valign="absmiddle" height="16" width="16" border="0" src="/olcweb/styles/shared/linkicons/image.gif"> (40.0K)</a> <a onClick="window.open('/olcweb/cgi/pluginpop.cgi?it=png::::/sites/dl/free/0000065899/773107/reportoption.png','popWin', 'width=578,height=321,resizable,scrollbars');" href="#"><img valign="absmiddle" height="16" width="16" border="0" src="/olcweb/styles/shared/linkicons/image.gif"> (40.0K)</a> -
Click View Report to generate the report.
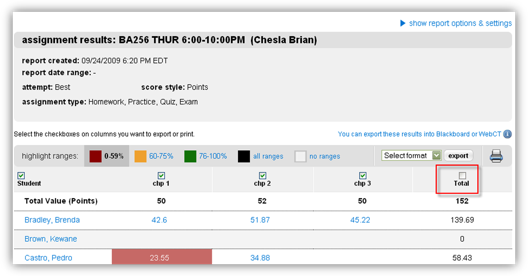 <a onClick="window.open('/olcweb/cgi/pluginpop.cgi?it=png::::/sites/dl/free/0000065899/773107/assignmentresults.png','popWin', 'width=578,height=346,resizable,scrollbars');" href="#"><img valign="absmiddle" height="16" width="16" border="0" src="/olcweb/styles/shared/linkicons/image.gif"> (52.0K)</a> <a onClick="window.open('/olcweb/cgi/pluginpop.cgi?it=png::::/sites/dl/free/0000065899/773107/assignmentresults.png','popWin', 'width=578,height=346,resizable,scrollbars');" href="#"><img valign="absmiddle" height="16" width="16" border="0" src="/olcweb/styles/shared/linkicons/image.gif"> (52.0K)</a> - Some reports, like the Assignment Results report, allow you to uncheck columns to exclude them from your report. Uncheck any columns you do not want exported.
-
Select the Blackboard format in the drop-down list.
 <a onClick="window.open('/olcweb/cgi/pluginpop.cgi?it=png::::/sites/dl/free/0000065899/773107/exportoption.png','popWin', 'width=NaN,height=NaN,resizable,scrollbars');" href="#"><img valign="absmiddle" height="16" width="16" border="0" src="/olcweb/styles/shared/linkicons/image.gif"> (14.0K)</a> <a onClick="window.open('/olcweb/cgi/pluginpop.cgi?it=png::::/sites/dl/free/0000065899/773107/exportoption.png','popWin', 'width=NaN,height=NaN,resizable,scrollbars');" href="#"><img valign="absmiddle" height="16" width="16" border="0" src="/olcweb/styles/shared/linkicons/image.gif"> (14.0K)</a> - Click Export and save file to computer.
- In Blackboard, go to your course Gradebook and select Upload Grades.
- Click Browse and select the file downloaded from Connect.
- Click Submit and then follow Blackboard's prompts to select settings for the new Gradebook entry.
Note: Due to formatting changes in Blackboard 8, you must add the WebCT ID column to you Connect Roster, and you will import your students' BlackBoard Usernames into. Below are the steps to set this column up and import Blackboard data. Click here to skip ahead to Exporting the Report if you already have already added the WebCT column and imported your students' BlackBoard usernames. - In Blackboard's Grade Center, select Download Grades.
-
Choose the Tab Delimited option and save file to your desktop.
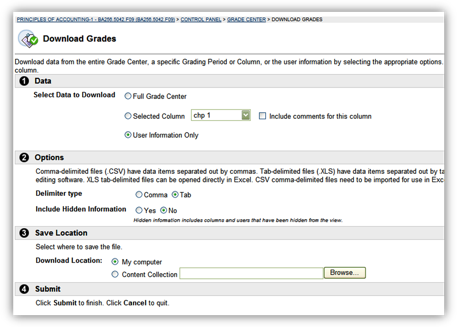 <a onClick="window.open('/olcweb/cgi/pluginpop.cgi?it=png::::/sites/dl/free/0000065899/773107/bb8export.png','popWin', 'width=508,height=397,resizable,scrollbars');" href="#"><img valign="absmiddle" height="16" width="16" border="0" src="/olcweb/styles/shared/linkicons/image.gif"> (76.0K)</a> <a onClick="window.open('/olcweb/cgi/pluginpop.cgi?it=png::::/sites/dl/free/0000065899/773107/bb8export.png','popWin', 'width=508,height=397,resizable,scrollbars');" href="#"><img valign="absmiddle" height="16" width="16" border="0" src="/olcweb/styles/shared/linkicons/image.gif"> (76.0K)</a> - Within Connect, go the section's Roster from my courses.
-
Click on customize columns.
 <a onClick="window.open('/olcweb/cgi/pluginpop.cgi?it=png::::/sites/dl/free/0000065899/773107/roster.png','popWin', 'width=577,height=311,resizable,scrollbars');" href="#"><img valign="absmiddle" height="16" width="16" border="0" src="/olcweb/styles/shared/linkicons/image.gif"> (34.0K)</a> <a onClick="window.open('/olcweb/cgi/pluginpop.cgi?it=png::::/sites/dl/free/0000065899/773107/roster.png','popWin', 'width=577,height=311,resizable,scrollbars');" href="#"><img valign="absmiddle" height="16" width="16" border="0" src="/olcweb/styles/shared/linkicons/image.gif"> (34.0K)</a> -
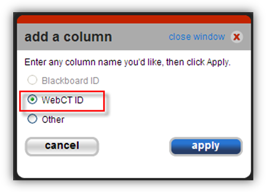
Click the add column button and choose WebCT ID.
 <a onClick="window.open('/olcweb/cgi/pluginpop.cgi?it=png::::/sites/dl/free/0000065899/773107/addacolumn1.png','popWin', 'width=316,height=263,resizable,scrollbars');" href="#"><img valign="absmiddle" height="16" width="16" border="0" src="/olcweb/styles/shared/linkicons/image.gif"> (25.0K)</a> <a onClick="window.open('/olcweb/cgi/pluginpop.cgi?it=png::::/sites/dl/free/0000065899/773107/addacolumn1.png','popWin', 'width=316,height=263,resizable,scrollbars');" href="#"><img valign="absmiddle" height="16" width="16" border="0" src="/olcweb/styles/shared/linkicons/image.gif"> (25.0K)</a> - Click Apply and then Save.
-
Click on import student information.
 <a onClick="window.open('/olcweb/cgi/pluginpop.cgi?it=png::::/sites/dl/free/0000065899/773107/roster1.png','popWin', 'width=579,height=304,resizable,scrollbars');" href="#"><img valign="absmiddle" height="16" width="16" border="0" src="/olcweb/styles/shared/linkicons/image.gif"> (36.0K)</a> <a onClick="window.open('/olcweb/cgi/pluginpop.cgi?it=png::::/sites/dl/free/0000065899/773107/roster1.png','popWin', 'width=579,height=304,resizable,scrollbars');" href="#"><img valign="absmiddle" height="16" width="16" border="0" src="/olcweb/styles/shared/linkicons/image.gif"> (36.0K)</a> -
Click on Export your current roster as a *csv template and save file to your desktop.
 <a onClick="window.open('/olcweb/cgi/pluginpop.cgi?it=png::::/sites/dl/free/0000065899/773107/importstudentinfo.png','popWin', 'width=NaN,height=NaN,resizable,scrollbars');" href="#"><img valign="absmiddle" height="16" width="16" border="0" src="/olcweb/styles/shared/linkicons/image.gif"> (28.0K)</a> <a onClick="window.open('/olcweb/cgi/pluginpop.cgi?it=png::::/sites/dl/free/0000065899/773107/importstudentinfo.png','popWin', 'width=NaN,height=NaN,resizable,scrollbars');" href="#"><img valign="absmiddle" height="16" width="16" border="0" src="/olcweb/styles/shared/linkicons/image.gif"> (28.0K)</a>
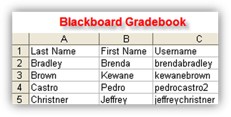 <a onClick="window.open('/olcweb/cgi/pluginpop.cgi?it=png::::/sites/dl/free/0000065899/773107/bbgradebook.png','popWin', 'width=NaN,height=NaN,resizable,scrollbars');" href="#"><img valign="absmiddle" height="16" width="16" border="0" src="/olcweb/styles/shared/linkicons/image.gif"> (21.0K)</a> <a onClick="window.open('/olcweb/cgi/pluginpop.cgi?it=png::::/sites/dl/free/0000065899/773107/bbgradebook.png','popWin', 'width=NaN,height=NaN,resizable,scrollbars');" href="#"><img valign="absmiddle" height="16" width="16" border="0" src="/olcweb/styles/shared/linkicons/image.gif"> (21.0K)</a>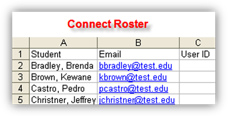 <a onClick="window.open('/olcweb/cgi/pluginpop.cgi?it=png::::/sites/dl/free/0000065899/773107/connectroster.png','popWin', 'width=NaN,height=NaN,resizable,scrollbars');" href="#"><img valign="absmiddle" height="16" width="16" border="0" src="/olcweb/styles/shared/linkicons/image.gif"> (20.0K)</a> <a onClick="window.open('/olcweb/cgi/pluginpop.cgi?it=png::::/sites/dl/free/0000065899/773107/connectroster.png','popWin', 'width=NaN,height=NaN,resizable,scrollbars');" href="#"><img valign="absmiddle" height="16" width="16" border="0" src="/olcweb/styles/shared/linkicons/image.gif"> (20.0K)</a> - Open both the Blackboard Gradebook downloaded previously and the Connect Roster in Microsoft Excel.
- Copy the Username from the Blackboard file into the User ID column in the Connect Roster file.
- When complete, in Connect select the roster file and click Upload.
- Select a section from my courses.
- Click the Reports tab at the top right of the page.
- Select a report, changing any options if needed.
- Click View Report to generate the report.
-
Some reports, like the Assignment Results report, allow you to uncheck columns to exclude them from your report. Uncheck any columns you do not want exported.
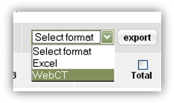
 <a onClick="window.open('/olcweb/cgi/pluginpop.cgi?it=png::::/sites/dl/free/0000065899/773107/assignmentresults.png','popWin', 'width=578,height=346,resizable,scrollbars');" href="#"><img valign="absmiddle" height="16" width="16" border="0" src="/olcweb/styles/shared/linkicons/image.gif"> (52.0K)</a> <a onClick="window.open('/olcweb/cgi/pluginpop.cgi?it=png::::/sites/dl/free/0000065899/773107/assignmentresults.png','popWin', 'width=578,height=346,resizable,scrollbars');" href="#"><img valign="absmiddle" height="16" width="16" border="0" src="/olcweb/styles/shared/linkicons/image.gif"> (52.0K)</a> - Select the WebCT format option from the drop-down.
 <a onClick="window.open('/olcweb/cgi/pluginpop.cgi?it=png::::/sites/dl/free/0000065899/773107/exportoptionwebct.png','popWin', 'width=NaN,height=NaN,resizable,scrollbars');" href="#"><img valign="absmiddle" height="16" width="16" border="0" src="/olcweb/styles/shared/linkicons/image.gif"> (11.0K)</a> <a onClick="window.open('/olcweb/cgi/pluginpop.cgi?it=png::::/sites/dl/free/0000065899/773107/exportoptionwebct.png','popWin', 'width=NaN,height=NaN,resizable,scrollbars');" href="#"><img valign="absmiddle" height="16" width="16" border="0" src="/olcweb/styles/shared/linkicons/image.gif"> (11.0K)</a> - Click Export and save the file to your Desktop.
-
In the file that was just downloaded, change the first column's name from User ID to Username.
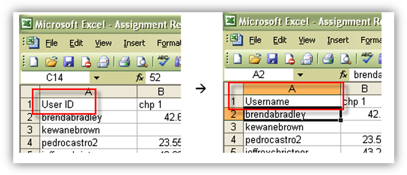 <a onClick="window.open('/olcweb/cgi/pluginpop.cgi?it=png::::/sites/dl/free/0000065899/773107/webctfile.png','popWin', 'width=NaN,height=NaN,resizable,scrollbars');" href="#"><img valign="absmiddle" height="16" width="16" border="0" src="/olcweb/styles/shared/linkicons/image.gif"> (59.0K)</a> <a onClick="window.open('/olcweb/cgi/pluginpop.cgi?it=png::::/sites/dl/free/0000065899/773107/webctfile.png','popWin', 'width=NaN,height=NaN,resizable,scrollbars');" href="#"><img valign="absmiddle" height="16" width="16" border="0" src="/olcweb/styles/shared/linkicons/image.gif"> (59.0K)</a> - Within Blackboard's Grade Center, choose Upload.
-
Click Browse and navigate to the saved file on your Desktop, keep Delimiter Type as Auto.
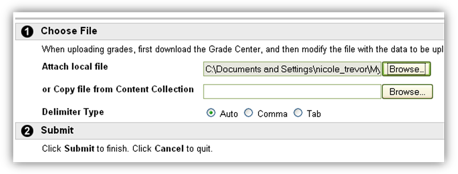 <a onClick="window.open('/olcweb/cgi/pluginpop.cgi?it=png::::/sites/dl/free/0000065899/773107/bbupload.png','popWin', 'width=NaN,height=NaN,resizable,scrollbars');" href="#"><img valign="absmiddle" height="16" width="16" border="0" src="/olcweb/styles/shared/linkicons/image.gif"> (31.0K)</a> <a onClick="window.open('/olcweb/cgi/pluginpop.cgi?it=png::::/sites/dl/free/0000065899/773107/bbupload.png','popWin', 'width=NaN,height=NaN,resizable,scrollbars');" href="#"><img valign="absmiddle" height="16" width="16" border="0" src="/olcweb/styles/shared/linkicons/image.gif"> (31.0K)</a> - Follow any remaining prompts within Blackboard and click Submit.
Note: You must add the WebCT ID column to you Connect Roster, and then you will import your students' WebCT Usernames into. Below are the steps to set this column up and import WebCT data. Click here to skip ahead to Exporting the Report if you already have already added the WebCT column and imported your students' User ID's. - In WebCT's Gradebook, go to download your roster and choose Comma Delimited.
- Submit and save file to your Desktop.
-
The downloaded csv should be in the format shown below when opened in Microsoft Excel.
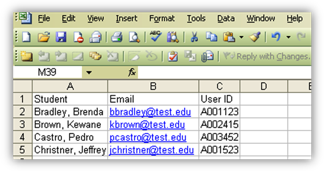 <a onClick="window.open('/olcweb/cgi/pluginpop.cgi?it=png::::/sites/dl/free/0000065899/773107/webctgradebook.png','popWin', 'width=NaN,height=NaN,resizable,scrollbars');" href="#"><img valign="absmiddle" height="16" width="16" border="0" src="/olcweb/styles/shared/linkicons/image.gif"> (51.0K)</a> <a onClick="window.open('/olcweb/cgi/pluginpop.cgi?it=png::::/sites/dl/free/0000065899/773107/webctgradebook.png','popWin', 'width=NaN,height=NaN,resizable,scrollbars');" href="#"><img valign="absmiddle" height="16" width="16" border="0" src="/olcweb/styles/shared/linkicons/image.gif"> (51.0K)</a> - Within Connect, go to the section's Roster from my courses.
-
Click Customize Columns.
 <a onClick="window.open('/olcweb/cgi/pluginpop.cgi?it=png::::/sites/dl/free/0000065899/773107/roster.png','popWin', 'width=577,height=311,resizable,scrollbars');" href="#"><img valign="absmiddle" height="16" width="16" border="0" src="/olcweb/styles/shared/linkicons/image.gif"> (34.0K)</a> <a onClick="window.open('/olcweb/cgi/pluginpop.cgi?it=png::::/sites/dl/free/0000065899/773107/roster.png','popWin', 'width=577,height=311,resizable,scrollbars');" href="#"><img valign="absmiddle" height="16" width="16" border="0" src="/olcweb/styles/shared/linkicons/image.gif"> (34.0K)</a> - Click the Add Columns button on the top right.
-
Choose WebCT ID.
 <a onClick="window.open('/olcweb/cgi/pluginpop.cgi?it=png::::/sites/dl/free/0000065899/773107/addacolumn1.png','popWin', 'width=316,height=263,resizable,scrollbars');" href="#"><img valign="absmiddle" height="16" width="16" border="0" src="/olcweb/styles/shared/linkicons/image.gif"> (25.0K)</a> <a onClick="window.open('/olcweb/cgi/pluginpop.cgi?it=png::::/sites/dl/free/0000065899/773107/addacolumn1.png','popWin', 'width=316,height=263,resizable,scrollbars');" href="#"><img valign="absmiddle" height="16" width="16" border="0" src="/olcweb/styles/shared/linkicons/image.gif"> (25.0K)</a> - Click Apply and Save.
-
Choose the import student info link on the top right of roster.
 <a onClick="window.open('/olcweb/cgi/pluginpop.cgi?it=png::::/sites/dl/free/0000065899/773107/roster1.png','popWin', 'width=579,height=304,resizable,scrollbars');" href="#"><img valign="absmiddle" height="16" width="16" border="0" src="/olcweb/styles/shared/linkicons/image.gif"> (36.0K)</a> <a onClick="window.open('/olcweb/cgi/pluginpop.cgi?it=png::::/sites/dl/free/0000065899/773107/roster1.png','popWin', 'width=579,height=304,resizable,scrollbars');" href="#"><img valign="absmiddle" height="16" width="16" border="0" src="/olcweb/styles/shared/linkicons/image.gif"> (36.0K)</a> -
Browse to the file exported from WebCT and click Upload.
 <a onClick="window.open('/olcweb/cgi/pluginpop.cgi?it=png::::/sites/dl/free/0000065899/773107/importroster.png','popWin', 'width=580,height=356,resizable,scrollbars');" href="#"><img valign="absmiddle" height="16" width="16" border="0" src="/olcweb/styles/shared/linkicons/image.gif"> (47.0K)</a> <a onClick="window.open('/olcweb/cgi/pluginpop.cgi?it=png::::/sites/dl/free/0000065899/773107/importroster.png','popWin', 'width=580,height=356,resizable,scrollbars');" href="#"><img valign="absmiddle" height="16" width="16" border="0" src="/olcweb/styles/shared/linkicons/image.gif"> (47.0K)</a> - Confirm the student information and click on the save import button.
- Select a section from my courses.
- Click the Reports tab at the top right of the page.
- Select a report, changing any options if needed.
- Click View Report to generate the report.
-
Some reports, like the Assignment Results report, allow you to uncheck columns to exclude them from your report. Uncheck any columns you do not want exported.
 <a onClick="window.open('/olcweb/cgi/pluginpop.cgi?it=png::::/sites/dl/free/0000065899/773107/assignmentresults.png','popWin', 'width=578,height=346,resizable,scrollbars');" href="#"><img valign="absmiddle" height="16" width="16" border="0" src="/olcweb/styles/shared/linkicons/image.gif"> (52.0K)</a> <a onClick="window.open('/olcweb/cgi/pluginpop.cgi?it=png::::/sites/dl/free/0000065899/773107/assignmentresults.png','popWin', 'width=578,height=346,resizable,scrollbars');" href="#"><img valign="absmiddle" height="16" width="16" border="0" src="/olcweb/styles/shared/linkicons/image.gif"> (52.0K)</a> - Select the WebCT format from the drop-down box
 <a onClick="window.open('/olcweb/cgi/pluginpop.cgi?it=png::::/sites/dl/free/0000065899/773107/exportoptionwebct.png','popWin', 'width=NaN,height=NaN,resizable,scrollbars');" href="#"><img valign="absmiddle" height="16" width="16" border="0" src="/olcweb/styles/shared/linkicons/image.gif"> (11.0K)</a> <a onClick="window.open('/olcweb/cgi/pluginpop.cgi?it=png::::/sites/dl/free/0000065899/773107/exportoptionwebct.png','popWin', 'width=NaN,height=NaN,resizable,scrollbars');" href="#"><img valign="absmiddle" height="16" width="16" border="0" src="/olcweb/styles/shared/linkicons/image.gif"> (11.0K)</a> - Click Export and save file to Desktop.
- In WebCT, go to your Gradebook and choose to upload grades.
- If given an option, choose Comma Delimited or set to Auto.
- Select the Connect report file from your computer and confirm prompts from WebCT.
|


